To download the code, login with one of the following social providers.
Login
Be patient..... we are fetching your source code.
Objective
Main objective of this blog post is to give you an idea about how to Customize Tab Bar Controller in iOS
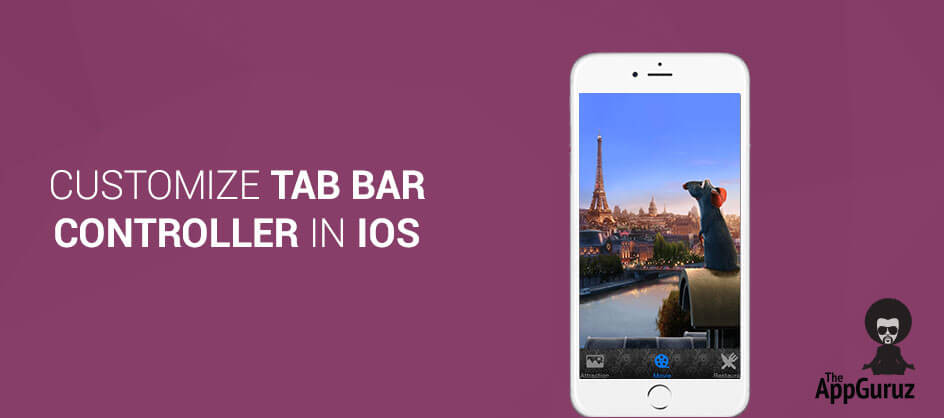
You will get Final Output:


Introduction:
The Tab Bar Controller class in iOS defines a specific ViewController which uses to navigate between the views by tapping the button/tab in the bottom of the root view controller. Each Tab of tab bar is associated with a custom view controller. When the user selects a specific tab, the tab bar controller displays the root view of the corresponding view controller, replacing any previous views.
Tab Bar are generally used to represent different type of information or same information using different interface. Here we are going to customize the interface of Tab Controller and the views associated with the controller, so that user are made aware of tab bar controller and its use in the application.
Step 1 Create Xcode Project
Create a new xcode project and select new tabbed application under the section ios and press next. Name the project and company name as per your preference , here I am naming the project as TabBarControllerDemo and company name as TheAppGuruz.

Here we can see in the Main.storyboard that the TabBarController has already two view controllers in relationship with it by default.
Step 2 Design UI
We will make an app which has there tabs to navigate between hence in the main.storyboard we are going to add another viewcontroller and create a relationship between the tabbarcontroller and the newly added view controller. For that cntrl press from tabbarcontroller and drag it to newly added view controller screen as shown below, select the viewcontrollers under the relationship segue.

We can see that the Tab Bar Controller has a newly added tab at the bottom as shown:

Step 3 Add Custom Tabbar Items
Now we are gonna customize the Tab bar items, for that select the tab bar item at the bottom of the each view controller and in the 4th inspector change the title and icon image to Movie and movieicon.png as shown below:

Similarly for the other two view controllers change their title and icon image to restaurant and restuaranticon.png and Attraction and attractionicon.png respectively.
Hence the bottom tab bar of Tab Bar Controller will look similar to:

Step 4 Initialized TabBarController in AppDelegate file
In order to change the appearance of the background of the Tab Bar controller and also to make the tab bar controller in working mode we need to crate an object of tab bar controller and for that we need to add the following lines of code in the Appdelegate.m file in the Application: didFinishLaunchingWithOptions method:
- (BOOL)application:(UIApplication *)application didFinishLaunchingWithOptions:(NSDictionary *)launchOptions
{
UITabBarController *tbController = (UITabBarController *)self.window.rootViewController;
UITabBar *tbAppearence = [UITabBar appearance];
[tbAppearence setBackgroundImage:[UIImage imageNamed:@"blackbg"]];
return YES;
}
Step 5 Create Restaurant View Controller
Create a class for the third view controller under the UIViewController class and name it as RestaurantViewController and also rename the first and second view controller class as AttractionViewController and MovieViewController resp. In the 3rd inspector of the ThirdViewController select the class as RestaurantViewController.

Step 6 Initialized image & set
Here we are gonna display an image for the each item selected in the tab bar, hence place an ImageView on each controller that will have an image for each item. Create an outlet from ImageView in their respective ViewControllers.
Add the following code in the viewDidLoad method in RestaurantViewController.m file:
@implementation RestaurantViewController
@synthesize ivRestuarantImg;

- (void)viewDidLoad
{
[super viewDidLoad];
ivRestuarantImg.image = [UIImage imageNamed:@"restuarant.jpg"];
}
In the MovieViewController.m file add code in viewDidLoad method as follows:
@implementation MovieViewController
@synthesize ivMovieImg;

- (void)viewDidLoad
{
[super viewDidLoad];
ivMovieImg.image = [UIImage imageNamed:@"movie"];
}
In the AttractionViewController.m file in viewDidLoad method add code as follows:
@implementation AttractionViewController
@synthesize ivAttractionImg;

- (void)viewDidLoad
{
[super viewDidLoad];
ivAttractionImg.image = [UIImage imageNamed:@"Attraction.jpg"];
}
All the images are available for download along with source code.
I hope you will find this blog post very useful. While working with UIPageViewController in IOS. Let me know in comment if you have any questions regarding in IOS. I will reply you ASAP.
Got an Idea of iPhone App Development? What are you still waiting for? Contact us now and see the Idea live soon. Our company has been named as one of the best iPhone App Development Company in India.

I am a Techno Freak who likes to explore new technologies and as an iOS developer and enthusiast I try to learn new things which polish my development skills, so that applications are made more users friendly.
Attribute In Unity