Be patient..... we are fetching your source code.
Objective
The main objective of this post is to describe how to add, edit or view contacts from your application.
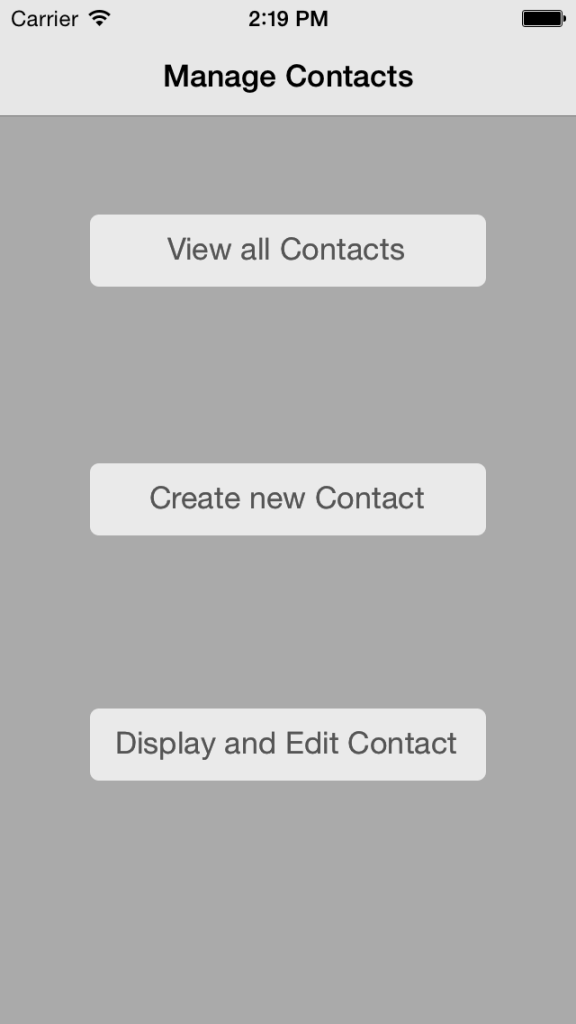
You will get Final Output

In following demo I have described how to add new contacts, view all the contacts or edit particular contact from your application.
Step 1 Create Xcode Project
Create new XCode project name it as ManageContactsDemo. It contains one UIViewController in Main.storyboard file.
Step 2 Design UI
Add two UIButton in UIVIewController and set title View all Contact, Create new Contact and Display and Edit Contact respectively.
Step 3 Add Frameworks
Add AddressBook and AddressBookUI framework in your project. Declare property of type ABAddressBookRef name it addressBook and Add ABPeoplePickerNavigationControllerDelegate, ABNewPersonViewControllerDelegate, ABPersonViewControllerDelegate in ViewController.h file.
Step 4 Add CheckAddressBookAccess method
Add checkAddressBookAccess method to check permission to access contacts in ViewController.m file. Call checkAddressBookAccess() method from viewDidLoad() method.
#pragma mark Address Book Access
-(void)checkAddressBookAccess
{
switch (ABAddressBookGetAuthorizationStatus())
{
case kABAuthorizationStatusAuthorized:
[self accessGrantedForAddressBook];
break;
case kABAuthorizationStatusNotDetermined :
[self requestAddressBookAccess];
break;
case kABAuthorizationStatusDenied:
case kABAuthorizationStatusRestricted:
{
UIAlertView *alert = [[UIAlertView alloc] initWithTitle:@"Privacy Warning" message:@"Permission was not granted for Contacts." delegate:nil cancelButtonTitle:@"OK" otherButtonTitles:nil];
[alert show];
}
break;
default:
break;
}
}

-(void)requestAddressBookAccess
{
ViewController * __weak weakSelf = self;

ABAddressBookRequestAccessWithCompletion(self.addressBook, ^(bool granted, CFErrorRef error)
{
if (granted) { dispatch_async(dispatch_get_main_queue(), ^{
[weakSelf accessGrantedForAddressBook];
});
}
});
}

-(void)accessGrantedForAddressBook
{
UIAlertView *alert = [[UIAlertView alloc] initWithTitle:@"" message:@"Permission was granted for Contacts." delegate:nil cancelButtonTitle:@"Ok" otherButtonTitles:nil, nil];
[alert show];
alert=nil;
}
Step 5 Create array & display property
Create object of ABPeoplePickerNavigationController create array of display property and present ABPeoplePickerNavigationController in showPeoplePickerController() method. Call that method from btnViewAllContactsClicked() action method.
-(void)showPeoplePickerController
{
ABPeoplePickerNavigationController *picker = [[ABPeoplePickerNavigationController alloc] init];
picker.peoplePickerDelegate = self;
// Display only a person's phone, email, and birthdate
NSArray *displayedItems = [NSArray arrayWithObjects:[NSNumber numberWithInt:kABPersonPhoneProperty],
[NSNumber numberWithInt:kABPersonEmailProperty],
[NSNumber numberWithInt:kABPersonBirthdayProperty], nil];

picker.displayedProperties = displayedItems;
[self presentViewController:picker animated:YES completion:nil];
}

Add delegate methods of ABPeoplePickerNavigationControllerDelegate.

#pragma mark ABPeoplePickerNavigationControllerDelegate methods
-(BOOL) peoplePickerNavigationController:(ABPeoplePickerNavigationController *)peoplePicker shouldContinueAfterSelectingPerson:(ABRecordRef)person
{
return YES;
}

- (BOOL) peoplePickerNavigationController:(ABPeoplePickerNavigationController *)peoplePicker shouldContinueAfterSelectingPerson:(ABRecordRef)person property:(ABPropertyID)property identifier:(ABMultiValueIdentifier)identifier
{
return NO;
}

- (void) peoplePickerNavigationControllerDidCancel:(ABPeoplePickerNavigationController *)peoplePicker;
{
[self dismissViewControllerAnimated:YES completion:NULL];
}
Step 6 ABNewPersonViewControllerDelegate method
Create object of ABNewPersonViewController and present it in showNewPersonViewController() method. Call that method from btnCreateNewContactClicked() action method.
-(void)showNewPersonViewController
{
ABNewPersonViewController *picker = [[ABNewPersonViewController alloc] init];
picker.newPersonViewDelegate = self;
UINavigationController *navigation = [[UINavigationController alloc] initWithRootViewController:picker];
[self presentViewController:navigation animated:YES completion:nil];
}

Add delegate methods of ABNewPersonViewControllerDelegate.
- (void)newPersonViewController:(ABNewPersonViewController *)newPersonViewController didCompleteWithNewPerson:(ABRecordRef)person
{
[self dismissViewControllerAnimated:YES completion:NULL];
}
Step 7 Search person and display it
Search for a person with specific name (In our example “ABC”)s. If Person with that name found then create object of ABPersonViewController and push ABPersonViewController otherwise display appropriate alert message. Do all this in showPersonViewController method.
-(void)showPersonViewController
{
// Search for the person named "Appleseed" in the address book
NSArray *people = (NSArray *)CFBridgingRelease(ABAddressBookCopyPeopleWithName(self.addressBook, CFSTR("Anna Haro")));
// Display "Appleseed" information if found in the address book
if ((people != nil) && [people count])
{
ABRecordRef person = (__bridge ABRecordRef)[people objectAtIndex:0];
ABPersonViewController *picker = [[ABPersonViewController alloc] init];
picker.personViewDelegate = self;
picker.displayedPerson = person;
// Allow users to edit the person’s information
picker.allowsEditing = YES;
[self.navigationController pushViewController:picker animated:YES];
}
else
{
// Show an alert if "Appleseed" is not in Contacts
UIAlertView *alert = [[UIAlertView alloc] initWithTitle:@"Error" message:@"Could not find contact named ABC (You must have to add contact with firstname ‘ABC’)." delegate:nil cancelButtonTitle:@"Cancel" otherButtonTitles:nil];
[alert show];
}
}

Add delegate methods of ABPersonViewControllerDelegate.
- (BOOL)personViewController:(ABPersonViewController *)personViewController shouldPerformDefaultActionForPerson:(ABRecordRef)person
property:(ABPropertyID)property identifier:(ABMultiValueIdentifier)identifierForValue
{
return NO;
}
Note
Add contact with firstname ABC for display and edit contact option.
If you have got any query related to how to manage contacts from your application in iOS comment them below.
Got an Idea of iPhone App Development? What are you still waiting for? Contact us now and see the Idea live soon. Our company has been named as one of the best iPhone App Development Company in India.

I am iOS developer with an aspiration of learning new technology and creating a bright future in Information Technology.
iOS - File Sharing Using WiFi
How to start FTP in Android
