Be patient..... we are fetching your source code.
Objective
In this tutorial we will learn on how to make tab views using ViewPager and ActionBar.
You will get final output:
Introduction:
Currently TabHost has been deprecated in android so, to achieve Tab navigation, ActionBar and Fragments it should be used. In this tutorial ViewPager and ActionBar is used to build this functionality.
Before getting into this, it is recommended to have knowledge on Fragments and ViewPager as these two are the two main concepts used here.
Now, we will create a simple application.
Step 1 Create new android project
Follow the given steps to create a new project:
- In Eclipse go to File >> New >> Android Application Project
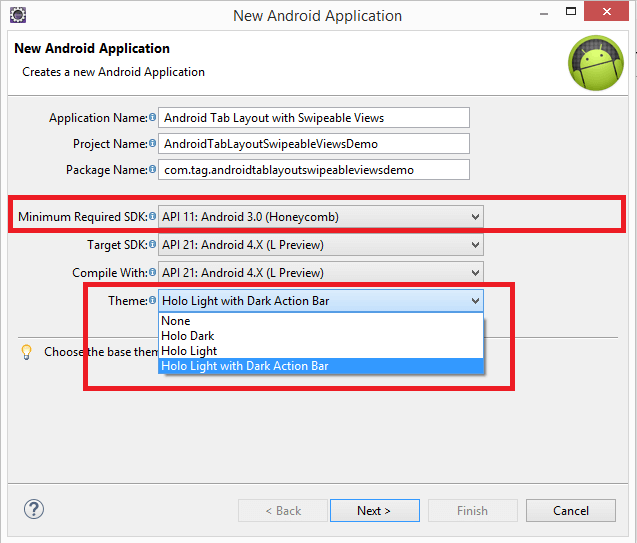
- Select Minimum Required SDK to Android 3.0.
- Choose Holo Light with Dark Action Bar as a theme.
- Click on next and create a new project.
Step 2 FragmentActivity.
We are going to use Fragments so for that extend your main activity with FragmentActivity instead of Activity and also implement ActionBar.TabListner interface.
public class MainActivity extends FragmentActivity implements TabListener {
Step 3 activity_name.xml file
Open your layout file and add ViewPager as Element. (Here layout file name is activity_name.xml)
<android.support.v4.view.ViewPager xmlns:android="http://schemas.android.com/apk/res/android"
    android:id="@+id/viewPager"
    android:layout_width="match_parent"
    android:layout_height="match_parent"
    android:background="#00cd00" >

</android.support.v4.view.ViewPager>
Step 4 FragmentPagerAdapter
Now, we need to create adapter for ViewPager. To create new class extend it with FragmentPagerAdapter. This class provides fragment views to ViewPager.
package com.tag.androidtablayoutswipeableviewsdemo;

import android.support.v4.app.Fragment;
import android.support.v4.app.FragmentManager;
import android.support.v4.app.FragmentPagerAdapter;

public class TabPagerAdapter extends FragmentPagerAdapter {

public TabPagerAdapter(FragmentManager fm) {
super(fm);
}

@Override
public Fragment getItem(int arg0) {
switch (arg0) {
case 0:
return new FirstTab();
case 1:
return new SecondTab();
case 2:
return new ThirdTab();
default:
break;
}
return null;
}

@Override
public int getCount() {
return 3;
}
}
Step 5 MainActivity.java file
In order to display tabs we don’t need to use TabHost or any other UI widget. ActionBar itself has the capability to display tabs. We only need to enable it using setNavigationMode(ActionBar.NAVIGATION_MODE_TABS)method.
Here, I have added only 3 tabs. You can add more as per your need.
MainActivity.java:
package com.tag.androidtablayoutswipeableviewsdemo;

import android.annotation.SuppressLint;
import android.app.ActionBar;
import android.app.ActionBar.Tab;
import android.app.ActionBar.TabListener;
import android.app.FragmentTransaction;
import android.os.Bundle;
import android.support.v4.app.FragmentActivity;
import android.support.v4.view.ViewPager;
import android.support.v4.view.ViewPager.OnPageChangeListener;

@SuppressLint("NewApi")
public class MainActivity extends FragmentActivity implements TabListener {
private ViewPager viewPager;
private TabPagerAdapter tabPagerAdapter;
private ActionBar actionBar;
private String[] tabNames = { "First", "Second", "Third" };

@Override
protected void onCreate(Bundle savedInstanceState) {
super.onCreate(savedInstanceState);
setContentView(R.layout.activity_main);
viewPager = (ViewPager) findViewById(R.id.viewPager);
tabPagerAdapter = new TabPagerAdapter(getSupportFragmentManager());
viewPager.setAdapter(tabPagerAdapter);
actionBar = getActionBar();
actionBar.setHomeButtonEnabled(true);
actionBar.setNavigationMode(ActionBar.NAVIGATION_MODE_TABS);
for (int i = 0; i < 3; i++) {
actionBar.addTab(actionBar.newTab().setText(tabNames[i])
.setTabListener(this));
}
viewPager.setOnPageChangeListener(new OnPageChangeListener() {

@Override
public void onPageSelected(int postion) {
actionBar.setSelectedNavigationItem(postion);
}

@Override
public void onPageScrolled(int arg0, float arg1, int arg2) {

}

@Override
public void onPageScrollStateChanged(int arg0) {

}
});
}

@Override
public void onTabReselected(Tab tab, FragmentTransaction ft) {
// TODO Auto-generated method stub

}

@Override
public void onTabSelected(Tab tab, FragmentTransaction ft) {
viewPager.setCurrentItem(tab.getPosition());
}

@Override
public void onTabUnselected(Tab tab, FragmentTransaction ft) {
// TODO Auto-generated method stub

}
}
For more information about OnPageChangeListener please refer following link:
Now if you run the project you will see the following output.
Step 6 ViewPager
Now, create fragments to add it into the ViewPager.
First Tab:
package com.tag.androidtablayoutswipeableviewsdemo;

import android.graphics.Color;
import android.os.Bundle;
import android.support.v4.app.Fragment;
import android.view.Gravity;
import android.view.LayoutInflater;
import android.view.View;
import android.view.ViewGroup;
import android.widget.LinearLayout.LayoutParams;
import android.widget.TextView;

public class FirstTab extends Fragment {

@Override
public View onCreateView(LayoutInflater inflater, ViewGroup container,
Bundle savedInstanceState) {
TextView tv = new TextView(getActivity());
tv.setText("First Tab");
tv.setGravity(Gravity.CENTER);
tv.setTextColor(Color.WHITE);
tv.setWidth(LayoutParams.MATCH_PARENT);
tv.setHeight(LayoutParams.MATCH_PARENT);
tv.setBackgroundColor(Color.RED);
tv.setTextAppearance(getActivity(),
android.R.style.TextAppearance_Large);
return tv;
}
}
Second Tab:
package com.tag.androidtablayoutswipeableviewsdemo;

import android.graphics.Color;
import android.os.Bundle;
import android.support.v4.app.Fragment;
import android.view.Gravity;
import android.view.LayoutInflater;
import android.view.View;
import android.view.ViewGroup;
import android.widget.TextView;
import android.widget.LinearLayout.LayoutParams;

public class SecondTab extends Fragment {
@Override
public View onCreateView(LayoutInflater inflater, ViewGroup container,
Bundle savedInstanceState) {
TextView tv = new TextView(getActivity());
tv.setText("Second Tab");
tv.setGravity(Gravity.CENTER);
tv.setTextColor(Color.WHITE);
tv.setWidth(LayoutParams.MATCH_PARENT);
tv.setHeight(LayoutParams.MATCH_PARENT);
tv.setBackgroundColor(Color.YELLOW);
tv.setTextAppearance(getActivity(),
android.R.style.TextAppearance_Large);
return tv;
}

}
Third Tab:
package com.tag.androidtablayoutswipeableviewsdemo;

import android.graphics.Color;
import android.os.Bundle;
import android.support.v4.app.Fragment;
import android.view.Gravity;
import android.view.LayoutInflater;
import android.view.View;
import android.view.ViewGroup;
import android.widget.TextView;
import android.widget.LinearLayout.LayoutParams;

public class ThirdTab extends Fragment {
@Override
public View onCreateView(LayoutInflater inflater, ViewGroup container,
Bundle savedInstanceState) {
TextView tv = new TextView(getActivity());
tv.setText("First Tab");
tv.setGravity(Gravity.CENTER);
tv.setTextColor(Color.WHITE);
tv.setWidth(LayoutParams.MATCH_PARENT);
tv.setHeight(LayoutParams.MATCH_PARENT);
tv.setBackgroundColor(Color.CYAN);
tv.setTextAppearance(getActivity(),
android.R.style.TextAppearance_Large);
return tv;
}

}
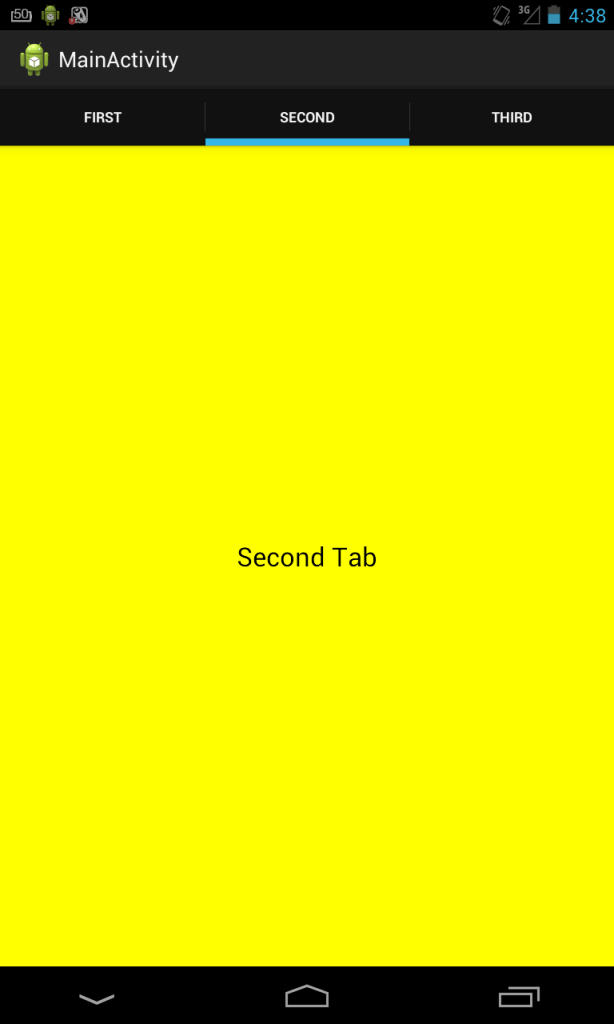
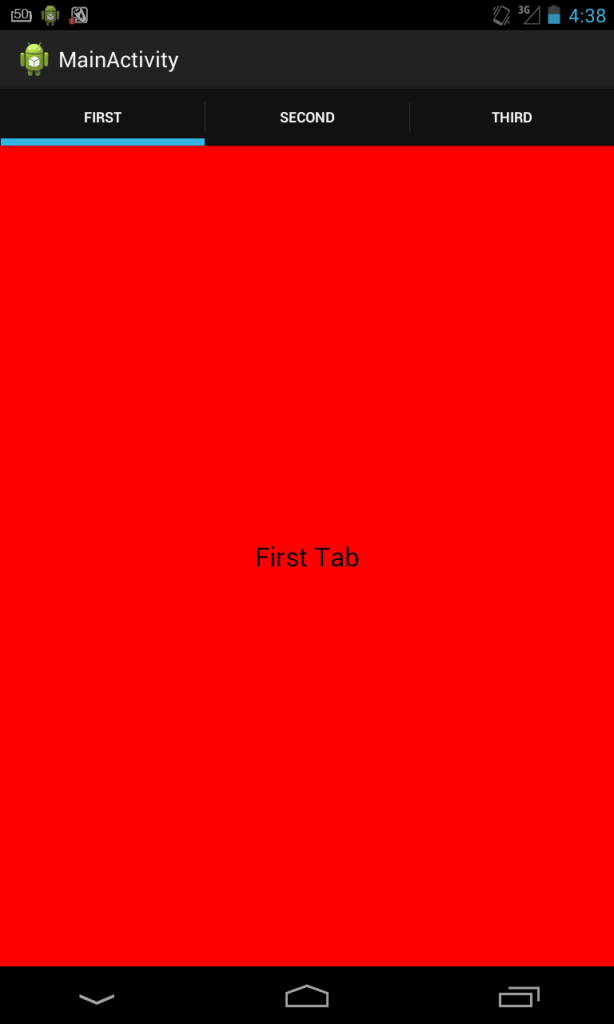
Now run the project and see if it’s working or not.
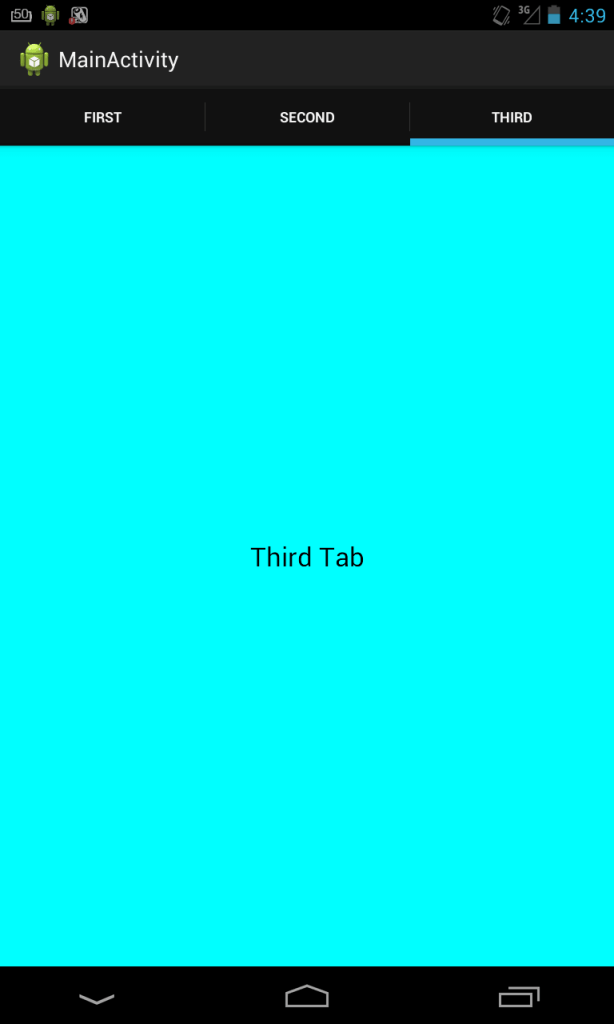
Step 7 Tab ChangeLisetener
If you run the project you will see that swipe view is working but if you select any tab, it won’t change. For that we need to use Tab Change Listener.
Add the following code to your activity for it:
@Override
public void onTabReselected(Tab tab, FragmentTransaction ft) {
// TODO Auto-generated method stub

}

@Override
public void onTabSelected(Tab tab, FragmentTransaction ft) {
viewPager.setCurrentItem(tab.getPosition());
}

@Override
public void onTabUnselected(Tab tab, FragmentTransaction ft) {
// TODO Auto-generated method stub

}
Step 8 ViewChangeListener
Now, if you swipe in ViewPager it won’t change the tab according to Swipe. For that we need to implement View Change Listener.
Add the following lines to your code:
viewPager.setOnPageChangeListener(new OnPageChangeListener() {

@Override
public void onPageSelected(int postion) {
actionBar.setSelectedNavigationItem(postion);
}

@Override
public void onPageScrolled(int arg0, float arg1, int arg2) {

}

@Override
public void onPageScrollStateChanged(int arg0) {

}
});
Now, your project will run perfectly.
Complete Code of MainActivity.java
package com.tag.androidtablayoutswipeableviewsdemo;

import android.annotation.SuppressLint;
import android.app.ActionBar;
import android.app.ActionBar.Tab;
import android.app.ActionBar.TabListener;
import android.app.FragmentTransaction;
import android.os.Bundle;
import android.support.v4.app.FragmentActivity;
import android.support.v4.view.ViewPager;
import android.support.v4.view.ViewPager.OnPageChangeListener;

@SuppressLint("NewApi")
public class MainActivity extends FragmentActivity implements TabListener {
private ViewPager viewPager;
private TabPagerAdapter tabPagerAdapter;
private ActionBar actionBar;
private String[] tabNames = { "First", "Second", "Third" };

@Override
protected void onCreate(Bundle savedInstanceState) {
super.onCreate(savedInstanceState);
setContentView(R.layout.activity_main);
viewPager = (ViewPager) findViewById(R.id.viewPager);
tabPagerAdapter = new TabPagerAdapter(getSupportFragmentManager());
viewPager.setAdapter(tabPagerAdapter);
actionBar = getActionBar();
actionBar.setHomeButtonEnabled(true);
actionBar.setNavigationMode(ActionBar.NAVIGATION_MODE_TABS);
for (int i = 0; i < 3; i++) {
actionBar.addTab(actionBar.newTab().setText(tabNames[i])
.setTabListener(this));
}
viewPager.setOnPageChangeListener(new OnPageChangeListener() {

@Override
public void onPageSelected(int postion) {
actionBar.setSelectedNavigationItem(postion);
}

@Override
public void onPageScrolled(int arg0, float arg1, int arg2) {

}

@Override
public void onPageScrollStateChanged(int arg0) {

}
});
}

@Override
public void onTabReselected(Tab tab, FragmentTransaction ft) {
// TODO Auto-generated method stub

}

@Override
public void onTabSelected(Tab tab, FragmentTransaction ft) {
viewPager.setCurrentItem(tab.getPosition());
}

@Override
public void onTabUnselected(Tab tab, FragmentTransaction ft) {
// TODO Auto-generated method stub

}
}
I hope you find this blog is very helpful while working with Android Tab Layout With Swipeable Views. Let me know if you have any questions regarding Android App Development.
Got an Idea of Android App Development? What are you still waiting for? Contact us now and see the Idea live soon. Our company has been named as one of the best Android App Development Company in India.

I am dedicated and very enthusiastic Android developer. I love to develop unique and creative apps and also like to learn new programing languages and technology.
Using NSTimer Class in iOS
Unity Tips for Beginners
