To download the code, login with one of the following social providers.
Login
Be patient..... we are fetching your source code.
Objective
The main objective of this blog post is to explain fundamentals of RecyclerView and giving you brief introduction about RecyclerView
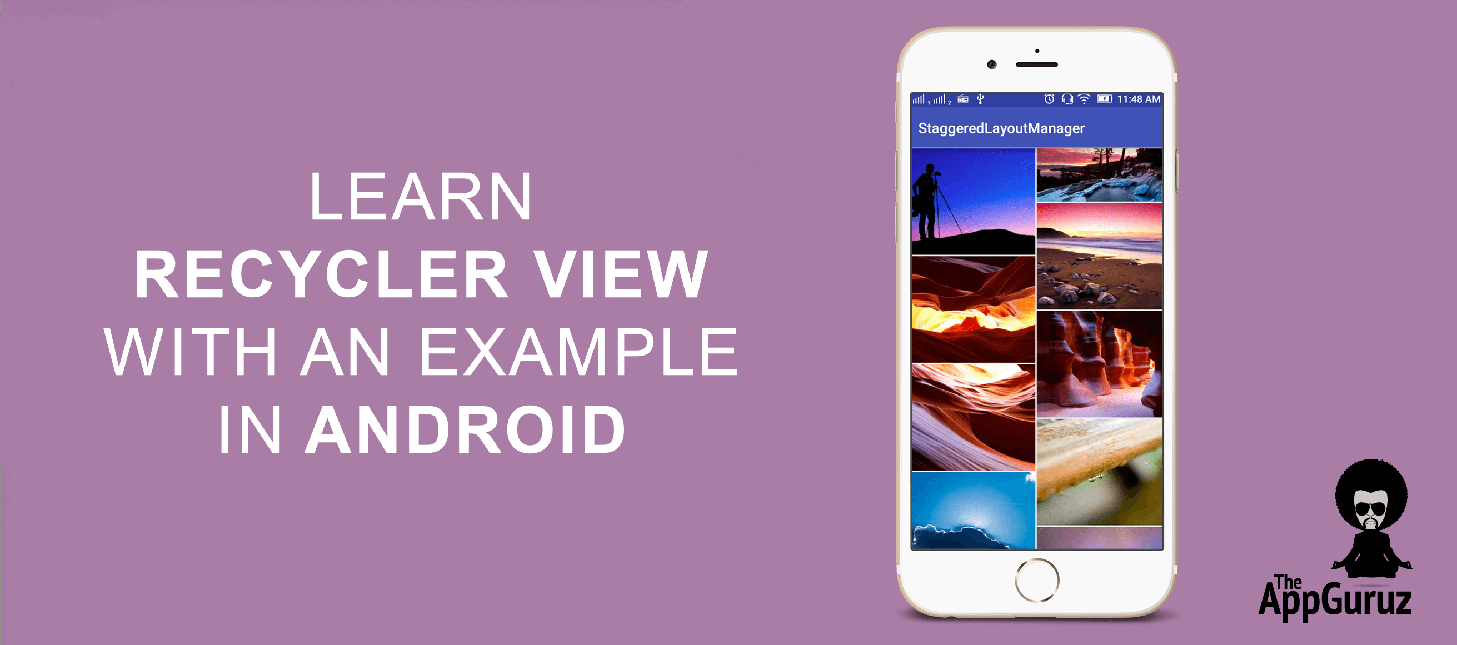
Final Output:
Step 1 Introduction
1.1 What is RecyclerView?
The RecyclerView widget is a more advanced and flexible version of ListView.
1.2 Why RecyclerView?
RecyclerView is a container for displaying large data sets that can be scrolled very efficiently by maintaining a limited number of views.
1.3 When you should use RecyclerView?
You can use the RecyclerView widget when you have data collections whose elements changes at runtime based on user action or network events.
1.4 RecyclerView v/s ListView
There are lots of new extended functionalities available in RecyclerView that are not directly supported by ListView as following:
- Direct horizontal scrolling is not supported in ListView. Whereas in RecyclerView you can easily implement horizontal and vertical scrolling.
- ListView supports only simple linear list view with vertical scrolling. Whereas RecyclerView supports three types of lists using RecyclerView.LayoutManager
- StaggeredGridLayoutManager
- GridLayoutManager
- LinearLayoutManager
- ListView gives you an option to add divider using dividerHeight parameter whereas RecyclerView enable you to customize divider (spacing) between two elements using RecyclerView.ItemDecoration class.
Let's make an example of RecyclerView.
Step 2 Create Layout Files
Here, I would be creating three layout files as following activity_main.xml
This is the layout file for MainActivity.java file:
<?xml version="1.0" encoding="utf-8"?>
<ScrollView xmlns:android="http://schemas.android.com/apk/res/android"
    android:layout_width="match_parent"
    android:layout_height="match_parent">
    <LinearLayout
        android:layout_width="match_parent"
        android:layout_height="wrap_content"
        android:gravity="center"
        android:orientation="vertical">
        <TextView
            android:layout_width="fill_parent"
            android:layout_height="wrap_content"
            android:gravity="center"
            android:paddingBottom="20dip"
            android:paddingTop="30dp"
            android:text="@string/label_examples"
            android:textSize="24sp" />
        <Button
            android:id="@+id/btnMainStaggeredGridLayout"
            android:layout_width="320dp"
            android:layout_height="wrap_content"
            android:layout_margin="20dp"
            android:text="@string/staggered_grid_layout" />
        <Button
            android:id="@+id/btnMainGridLayout"
            android:layout_width="320dp"
            android:layout_height="wrap_content"
            android:layout_margin="20dp"
            android:onClick="onImageGridClick"
            android:text="@string/grid_layout_manager" />
        <Button
            android:id="@+id/btnMainLinearLayout"
            android:layout_width="320dp"
            android:layout_height="wrap_content"
            android:layout_margin="20dp"
            android:onClick="onImagePagerClick"
            android:text="@string/linear_layout_manager" />
    </LinearLayout>
</ScrollView>
activity_recycler_view_display.xml This file shows you a RecyclerView:
<?xml version="1.0" encoding="utf-8"?>
<LinearLayout xmlns:android="http://schemas.android.com/apk/res/android"
    android:orientation="vertical" android:layout_width="match_parent"
    android:layout_height="match_parent">

    <android.support.v7.widget.RecyclerView
        android:id="@+id/my_recycler_view"
        android:layout_width="match_parent"
        android:layout_height="match_parent"
        android:scrollbars="vertical" />

</LinearLayout>
demo_images.xml I would be inflating this layout in each RecyclerView:
<?xml version="1.0" encoding="utf-8"?>
<LinearLayout xmlns:android="http://schemas.android.com/apk/res/android"
    android:layout_width="wrap_content"
    android:layout_height="wrap_content"
    android:orientation="vertical">
    <ImageView
        android:id="@+id/ivItemGridImage"
        android:layout_width="match_parent"
        android:layout_height="wrap_content"
        android:layout_margin="1dp"
        android:adjustViewBounds="true" />
</LinearLayout>
Step 3 Customize RecyclerView.Adapter
To make adapter for ListView, we have to extend BaseAdapter. When we want to make adapter for RecyclerView, we will need to extend RecyclerView.Adapter. Now, I can do that for sure - but there is a problem.
3.1 Why do I need to Customize RecyclerView?
Problem:
RecyclerView.Adapter doesn’t give me an item click or item long click event. If I try to handle item's click and long click event directly through RecyclerView.Adapter then I’ll loose default selector of RecyclerView
So what’s the solution?
To resolve the problem I am creating custom adapter called CustomRecyclerViewAdapter.
So what am I doing in CustomRecyclerViewAdapter?
- I am extending RecyclerView.Adapter in CustomRecyclerViewAdapter
- All the click and long click events of an item is handled in CustomRecyclerViewAdapter.
Note
I have handled click and long click event of an adapter view in CustomRecyclerViewAdapter class. So, RecyclerView will not remove default selector.
I would be creating 3 kinds of adapters (StaggeredGrid, Grid, Linear). Each extends CustomRecyclerView adapter, so no need to handle these events into each class.
CustomRecyclerViewAdapter.java:
public abstract class CustomRecyclerViewAdapter extends RecyclerView
        .Adapter {
    private AdapterView.OnItemClickListener onItemClickListener;
    private AdapterView.OnItemLongClickListener onItemLongClickListener;
    public void setOnItemClickListener(AdapterView.OnItemClickListener onItemClickListener) {
        this.onItemClickListener = onItemClickListener;
    }
    public void setOnItemLongClickListener(AdapterView.OnItemLongClickListener onItemLongClickListener) {
        this.onItemLongClickListener = onItemLongClickListener;
    }
    private void onItemHolderClick(CustomRecycleViewHolder itemHolder) {
        if (onItemClickListener != null) {
            onItemClickListener.onItemClick(null, itemHolder.itemView,
                    itemHolder.getAdapterPosition(), itemHolder.getItemId());
        }
    }
    private void onItemHolderLongClick(CustomRecycleViewHolder itemHolder) {
        if (onItemLongClickListener != null) {
            onItemLongClickListener.onItemLongClick(null, itemHolder.itemView,
                    itemHolder.getAdapterPosition(), itemHolder.getItemId());
        }
    }
    public class CustomRecycleViewHolder extends RecyclerView.ViewHolder implements View.OnClickListener, View.OnLongClickListener {
        public CustomRecycleViewHolder(View itemView) {
            super(itemView);
            itemView.setOnClickListener(this);
            itemView.setOnLongClickListener(this);
        }
        @Override
        public void onClick(View v) {
            onItemHolderClick(this);
        }
        @Override
        public boolean onLongClick(View v) {
            onItemHolderLongClick(this);
            return true;
        }
    }
}
In the ListView I generally make Holder class. Now for RecyclerView I am extending a RecyclerView.ViewHolder class and creating my own holder class named CustomRecyclerViewHolder class.
public class CustomRecycleViewHolder extends RecyclerView.ViewHolder implements View.OnClickListener, View.OnLongClickListener {
        public CustomRecycleViewHolder(View itemView) {
            super(itemView);
            itemView.setOnClickListener(this);
            itemView.setOnLongClickListener(this);
        }
        @Override
        public void onClick(View v) {
            onItemHolderClick(this);
        }
        @Override
        public boolean onLongClick(View v) {
            onItemHolderLongClick(this);
            return true;
        }
    }
private AdapterView.OnItemClickListener onItemClickListener;
private AdapterView.OnItemLongClickListener onItemLongClickListener;
public void setOnItemClickListener(AdapterView.OnItemClickListener onItemClickListener) {
    this.onItemClickListener = onItemClickListener;
}
public void setOnItemLongClickListener(AdapterView.OnItemLongClickListener onItemLongClickListener) {
    this.onItemLongClickListener = onItemLongClickListener;
}
private void onItemHolderClick(CustomRecycleViewHolder itemHolder) {
    if (onItemClickListener != null) {
        onItemClickListener.onItemClick(null, itemHolder.itemView,
                itemHolder.getAdapterPosition(), itemHolder.getItemId());
    }
}
private void onItemHolderLongClick(CustomRecycleViewHolder itemHolder) {
    if (onItemLongClickListener != null) {
        onItemLongClickListener.onItemLongClick(null, itemHolder.itemView,
                itemHolder.getAdapterPosition(), itemHolder.getItemId());
    }
}
To know more about CustomRecycler.ViewHolder class please refer following link:
Next, I am going to show you the role of LayoutManager in RecyclerView.
Step 4 Create an adapter for each supported LayoutManager
4.1 LayoutManager in RecyclerView
RecyclerView supports three kinds of layout managers. Each one has its look and feel.
- StaggeredGridLayoutManager
- GridLayoutManager
- LinearLayoutManager
4.1.1 StaggeredGridLayoutManager:
It is a LayoutManager that lays out children in a staggered grid formation. It supports horizontal vertical layout as well as an ability to layout children in reverse.

package com.theappguruz.recycleviewdemo.adapter;
import android.app.Activity;
import android.content.Context;
import android.graphics.BitmapFactory;
import android.graphics.Point;
import android.view.Display;
import android.view.LayoutInflater;
import android.view.View;
import android.view.ViewGroup;
import android.view.WindowManager;
import android.widget.ImageView;
import com.squareup.picasso.Picasso;
import com.theappguruz.recycleviewdemo.R;
import com.theappguruz.recycleviewdemo.recycleview.CustomRecyclerViewAdapter;
import java.util.ArrayList;
public class StaggeredGridLayoutAdapter extends CustomRecyclerViewAdapter {
    private Activity activity;
    private ArrayList<String> images;
    private int screenWidth;
    public StaggeredGridLayoutAdapter(Activity activity, ArrayList<String> images) {
        this.activity = activity;
        this.images = images;
        WindowManager wm = (WindowManager) activity.getSystemService(Context.WINDOW_SERVICE);
        Display display = wm.getDefaultDisplay();
        Point size = new Point();
        display.getSize(size);
        screenWidth = size.x;
    }
    @Override
    public CustomRecycleViewHolder onCreateViewHolder(ViewGroup parent, int viewType) {
        View view = LayoutInflater.from(activity)
                .inflate(R.layout.demo_images, parent, false);
        Holder dataObjectHolder = new Holder(view);
        return dataObjectHolder;
    }
    @Override
    public void onBindViewHolder(final CustomRecycleViewHolder holder, final int position) {
        final Holder myHolder = (Holder) holder;
        BitmapFactory.Options opts = new BitmapFactory.Options();
        opts.inJustDecodeBounds = true;
        BitmapFactory.decodeFile(images.get(position), opts);
        opts.inJustDecodeBounds = false;
        int height;
        if (position == 1 || position == (images.size() - 1)) {
            height = 150;
        } else {
            height = 300;
        }
        Picasso.with(activity)
                .load(images.get(position))
                .error(R.drawable.ic_empty)
                .placeholder(R.drawable.ic_launcher)
                .resize(screenWidth / 2, height)
                .centerCrop()
                .into((myHolder.images));
    }
    @Override
    public int getItemCount() {
        return images.size();
    }
    public class Holder extends CustomRecycleViewHolder {
        private ImageView images;
        public Holder(View itemView) {
            super(itemView);
            images = (ImageView) itemView.findViewById(R.id.ivItemGridImage);
        }
    }
}
Create adapter for StaggeredGridLayoutManager:
- Get an Activity object and ArrayList(image URLs).
- Get the size of screen display (i.e. Screen resolution) using WindowsManager. It will give an object of Display class.
To learn more about WindowManager class please refer following link:
- Now get the size of the screen display by using Point class object.
Point size = new Point();
    display.getSize(size);
    screenWidth = size.x;
To get more information about Point and Display class please check out following links:
Point class: Display class: - To implement a ListView, I would be using BaseAdapter and override its getView() method.
- For the same, I would be overriding onCreateViewHolder() method to initialize ViewHolder class and get widget information.
Above method is called when RecyclerView needs a new RecyclerView.ViewHolder of the given type to represent an item.@Override public CustomRecycleViewHolder onCreateViewHolder(ViewGroup parent, int viewType) { View view = LayoutInflater.from(activity) .inflate(R.layout.demo_images, parent, false); Holder dataObjectHolder = new Holder(view); return dataObjectHolder; }To get more information about onCreateViewHolder() method see the below link:
- Now I would be overriding onBindViewHolder() method to display the data at the specified position. It updates the content of the itemView to reflect the item at the given position.
@Override public void onBindViewHolder(final CustomRecycleViewHolder holder, final int position) { final Holder myHolder = (Holder) holder; BitmapFactory.Options opts = new BitmapFactory.Options(); opts.inJustDecodeBounds = true; BitmapFactory.decodeFile(images.get(position), opts); opts.inJustDecodeBounds = false; int height; if (position == 1 || position == (images.size() - 1)) { height = 150; } else { height = 300; } Picasso.with(activity) .load(images.get(position)) .error(R.drawable.ic_empty) .placeholder(R.drawable.ic_launcher) .resize(screenWidth / 2, height) .centerCrop() .into((myHolder.images)); }To get more details about onBindViewHolder() method checkout following link:
Note
Here I am using Picasso library to load image from given URL. For that you just need add picasso-2.5.2.jar file into the libs folder and add dependency to gradle file.
compile files('libs/picasso-2.5.2.jar') - Create getItemCount() method which returns size of list that I am using to display images.
@Override public int getItemCount() { return images.size(); }To get more details about getItemCount() method checkout following link:
- I would be creating Holder class of my view which extends the CustomRecycleViewHolder class.
Difference between GridLayoutManager and StaggeredGridLayoutManager is the size (i.e. height width) of StaggeredGridLayoutManager elements can be different.public class Holder extends CustomRecycleViewHolder { private ImageView images; public Holder(View itemView) { super(itemView); images = (ImageView) itemView.findViewById(R.id.ivItemGridImage); } }
Staggered grids are likely to have gaps at the edges of the layout. To avoid these gaps, StaggeredGridLayoutManager can offset spans independently or move items between spans. You can control this behavior via setGapStrategy (int).int height; if (position == 1 || position == (images.size() - 1)) { height = 150; } else { height = 300; } Picasso.with(activity) .load(images.get(position)) .error(R.drawable.ic_empty) .placeholder(R.drawable.ic_launcher) .resize(screenWidth / 2, height) .centerCrop() .into((myHolder.images));
To get more information about StaggeredGridLayoutManager checkout following link:
Let’s see what is GridLayoutManager.
4.1.2 GridLayoutManager class:
GridLayoutManager is more or less same layout as of GridView but it has more functionalities than GridView. GridLayoutManager supports recycling functionalities that is not available in GridView.

GridLayoutAdapter.java:
package com.theappguruz.recycleviewdemo.adapter;
import android.app.Activity;
import android.content.Context;
import android.graphics.BitmapFactory;
import android.graphics.Point;
import android.view.Display;
import android.view.LayoutInflater;
import android.view.View;
import android.view.ViewGroup;
import android.view.WindowManager;
import android.widget.ImageView;
import com.squareup.picasso.Picasso;
import com.theappguruz.recycleviewdemo.R;
import com.theappguruz.recycleviewdemo.recycleview.CustomRecyclerViewAdapter;
import java.util.ArrayList;
public class GridLayoutAdapter extends CustomRecyclerViewAdapter {
private Activity activity;
private ArrayList<String> images;
private int screenWidth;
public GridLayoutAdapter(Activity activity, ArrayList<String> images) {
this.activity = activity;
this.images = images;
WindowManager wm = (WindowManager) activity.getSystemService(Context.WINDOW_SERVICE);
Display display = wm.getDefaultDisplay();
Point size = new Point();
display.getSize(size);
screenWidth = size.x;
}
@Override
public CustomRecycleViewHolder onCreateViewHolder(ViewGroup parent, int viewType) {
    View view = LayoutInflater.from(activity)
            .inflate(R.layout.demo_images, parent, false);
    Holder dataObjectHolder = new Holder(view);
    return dataObjectHolder;
}
@Override
public void onBindViewHolder(final CustomRecycleViewHolder holder, final int position) {
final Holder myHolder = (Holder) holder;
BitmapFactory.Options opts = new BitmapFactory.Options();
opts.inJustDecodeBounds = true;
BitmapFactory.decodeFile(images.get(position), opts);
opts.inJustDecodeBounds = false;
Picasso.with(activity)
.load(images.get(position))
.error(R.drawable.ic_empty)
.placeholder(R.drawable.ic_launcher)
.resize(screenWidth / 2, 300)
.centerCrop()
.into((myHolder.images));
}
@Override
public int getItemCount() {
    return images.size();
}
public class Holder extends CustomRecycleViewHolder {
    private ImageView images;
    public Holder(View itemView) {
        super(itemView);
        images = (ImageView) itemView.findViewById(R.id.ivItemGridImage);
    }
}
}
Here, I am extending CustomRecyclerViewAdapter to create GridLayoutAdapter class.
Constructor of GridLayoutAdapter class:
public GridLayoutAdapter(Activity activity, ArrayList<String> images) {
    this.activity = activity;
    this.images = images;
    WindowManager wm = (WindowManager) activity.getSystemService(Context.WINDOW_SERVICE);
    Display display = wm.getDefaultDisplay();
    Point size = new Point();
    display.getSize(size);
    screenWidth = size.x;
}
To get more information about GridLayoutManager see the below link:
4.1.3 LinearLayoutManager:
LinearLayoutManager provides same look and feel as ListView.

package com.theappguruz.recycleviewdemo.adapter;
import android.app.Activity;
import android.content.Context;
import android.graphics.BitmapFactory;
import android.graphics.Point;
import android.view.Display;
import android.view.LayoutInflater;
import android.view.View;
import android.view.ViewGroup;
import android.view.WindowManager;
import android.widget.ImageView;
import com.squareup.picasso.Picasso;
import com.theappguruz.recycleviewdemo.R;
import com.theappguruz.recycleviewdemo.recycleview.CustomRecyclerViewAdapter;
import java.util.ArrayList;
/**
 * Created by Nikunj Popat on 16-12-2015.
 */
public class LinearLayoutAdapter extends CustomRecyclerViewAdapter {
    private Activity activity;
    private ArrayList<String> images;
    private int screenWidth;
    public LinearLayoutAdapter(Activity activity, ArrayList<String> images) {
        this.activity = activity;
        this.images = images;
        WindowManager wm = (WindowManager) activity.getSystemService(Context.WINDOW_SERVICE);
        Display display = wm.getDefaultDisplay();
        Point size = new Point();
        display.getSize(size);
        screenWidth = size.x;
    }
    @Override
    public CustomRecyclerViewAdapter.CustomRecycleViewHolder onCreateViewHolder(ViewGroup parent, int viewType) {
        View view = LayoutInflater.from(activity)
                .inflate(R.layout.demo_images, parent, false);
        Holder dataObjectHolder = new Holder(view);
        return dataObjectHolder;
    }
    @Override
    public void onBindViewHolder(final CustomRecyclerViewAdapter.CustomRecycleViewHolder holder, final int position) {
        final Holder myHolder = (Holder) holder;
        BitmapFactory.Options opts = new BitmapFactory.Options();
        opts.inJustDecodeBounds = true;
        BitmapFactory.decodeFile(images.get(position), opts);
        opts.inJustDecodeBounds = false;
        Picasso.with(activity)
                .load(images.get(position))
                .error(R.drawable.ic_empty)
                .placeholder(R.drawable.ic_launcher)
                .resize(500, 500)
                .centerCrop()
                .into((myHolder.images));
    }
    @Override
    public int getItemCount() {
        return images.size();
    }
    public class Holder extends CustomRecyclerViewAdapter.CustomRecycleViewHolder {
        private ImageView images;
        public Holder(View itemView) {
            super(itemView);
            images = (ImageView) itemView.findViewById(R.id.ivItemGridImage);
        }
    }
}
To get more information about LinearLayoutManager see the below link:
I am done with all the adapters now. Now I would be calling these adapter views.
Step 5 MainActivity.java file for selecting different layout managers
In the MainActivity.java file I am giving options for selecting RecyclerView's layout style. Here you can see three buttons to set specific layout manager.
Check out MainActivity.java file.

package com.theappguruz.recycleviewdemo.activity;
import android.content.Intent;
import android.os.Bundle;
import android.support.v7.app.AppCompatActivity;
import android.view.View;
import android.widget.Button;
import com.theappguruz.recycleviewdemo.R;
import com.theappguruz.recycleviewdemo.constant.Constant;
public class MainActivity extends AppCompatActivity implements View.OnClickListener {
    private Button btnMainStaggeredGridLayout;
    private Button btnMainGridLayout;
    private Button btnMainLinearLayout;
    @Override
    protected void onCreate(Bundle savedInstanceState) {
        super.onCreate(savedInstanceState);
        setContentView(R.layout.activity_main);
        getWidgets();
        bindWidgetsWithEvents();
    }
    private void bindWidgetsWithEvents() {
        btnMainStaggeredGridLayout.setOnClickListener(this);
        btnMainGridLayout.setOnClickListener(this);
        btnMainLinearLayout.setOnClickListener(this);
    }
    private void getWidgets() {
        btnMainStaggeredGridLayout = (Button) findViewById(R.id.btnMainStaggeredGridLayout);
        btnMainGridLayout = (Button) findViewById(R.id.btnMainGridLayout);
        btnMainLinearLayout = (Button) findViewById(R.id.btnMainLinearLayout);
    }
    @Override
    public void onClick(View v) {
        Intent intent = new Intent(this, RecyclerViewDisplayActivity.class);
        if (v.getId() == R.id.btnMainStaggeredGridLayout) {
            intent.putExtra(Constant.LAYOUT_MANAGER, Constant.STAGGERED_LAYOUT_MANAGER);
        } else if (v.getId() == R.id.btnMainGridLayout) {
            intent.putExtra(Constant.LAYOUT_MANAGER, Constant.GRID_LAYOUT_MANAGER);
        } else if (v.getId() == R.id.btnMainLinearLayout) {
            intent.putExtra(Constant.LAYOUT_MANAGER, Constant.LINEAR_LAYOUT_MANAGER);
        }
        startActivity(intent);
    }
}
Here I would be passing string in intent, based on that layout manager will be organized.
Note
Check out also Constant.java file. Where I have declared so constant variables and used in activity files.
package com.theappguruz.recycleviewdemo.constant;
/**
 * Created by Nikunj Popat on 16-12-2015.
 */
public class Constant {
    public static final String[] IMAGES = new String[]{
            // Heavy images
            "https://lh6.googleusercontent.com/-55osAWw3x0Q/URquUtcFr5I/AAAAAAAAAbs/rWlj1RUKrYI/s1024/A%252520Photographer.jpg",
            "https://lh4.googleusercontent.com/--dq8niRp7W4/URquVgmXvgI/AAAAAAAAAbs/-gnuLQfNnBA/s1024/A%252520Song%252520of%252520Ice%252520and%252520Fire.jpg",
            "https://lh5.googleusercontent.com/-7qZeDtRKFKc/URquWZT1gOI/AAAAAAAAAbs/hqWgteyNXsg/s1024/Another%252520Rockaway%252520Sunset.jpg",
            "https://lh3.googleusercontent.com/--L0Km39l5J8/URquXHGcdNI/AAAAAAAAAbs/3ZrSJNrSomQ/s1024/Antelope%252520Butte.jpg",
            "https://lh6.googleusercontent.com/-8HO-4vIFnlw/URquZnsFgtI/AAAAAAAAAbs/WT8jViTF7vw/s1024/Antelope%252520Hallway.jpg",
            "https://lh4.googleusercontent.com/-WIuWgVcU3Qw/URqubRVcj4I/AAAAAAAAAbs/YvbwgGjwdIQ/s1024/Antelope%252520Walls.jpg",
            "https://lh6.googleusercontent.com/-UBmLbPELvoQ/URqucCdv0kI/AAAAAAAAAbs/IdNhr2VQoQs/s1024/Apre%2525CC%252580s%252520la%252520Pluie.jpg",
            "https://lh3.googleusercontent.com/-s-AFpvgSeew/URquc6dF-JI/AAAAAAAAAbs/Mt3xNGRUd68/s1024/Backlit%252520Cloud.jpg",
            "https://lh5.googleusercontent.com/-bvmif9a9YOQ/URquea3heHI/AAAAAAAAAbs/rcr6wyeQtAo/s1024/Bee%252520and%252520Flower.jpg",
            "https://lh5.googleusercontent.com/-n7mdm7I7FGs/URqueT_BT-I/AAAAAAAAAbs/9MYmXlmpSAo/s1024/Bonzai%252520Rock%252520Sunset.jpg",
            "https://lh6.googleusercontent.com/-4CN4X4t0M1k/URqufPozWzI/AAAAAAAAAbs/8wK41lg1KPs/s1024/Caterpillar.jpg",
            "https://lh3.googleusercontent.com/-rrFnVC8xQEg/URqufdrLBaI/AAAAAAAAAbs/s69WYy_fl1E/s1024/Chess.jpg",
            "https://lh5.googleusercontent.com/-WVpRptWH8Yw/URqugh-QmDI/AAAAAAAAAbs/E-MgBgtlUWU/s1024/Chihuly.jpg",
            "https://lh5.googleusercontent.com/-0BDXkYmckbo/URquhKFW84I/AAAAAAAAAbs/ogQtHCTk2JQ/s1024/Closed%252520Door.jpg",
            "https://lh3.googleusercontent.com/-PyggXXZRykM/URquh-kVvoI/AAAAAAAAAbs/hFtDwhtrHHQ/s1024/Colorado%252520River%252520Sunset.jpg",
            "https://lh3.googleusercontent.com/-ZAs4dNZtALc/URquikvOCWI/AAAAAAAAAbs/DXz4h3dll1Y/s1024/Colors%252520of%252520Autumn.jpg",
            "https://lh4.googleusercontent.com/-GztnWEIiMz8/URqukVCU7bI/AAAAAAAAAbs/jo2Hjv6MZ6M/s1024/Countryside.jpg",
            "https://lh4.googleusercontent.com/-bEg9EZ9QoiM/URquklz3FGI/AAAAAAAAAbs/UUuv8Ac2BaE/s1024/Death%252520Valley%252520-%252520Dunes.jpg",
    };
    public final static String LAYOUT_MANAGER="LayoutManager";
    public final static String STAGGERED_LAYOUT_MANAGER = "StaggeredLayoutManager";
    public final static String GRID_LAYOUT_MANAGER = "GridLayoutManager";
    public final static String LINEAR_LAYOUT_MANAGER = "LinearLayoutManager";
}
Let's call requested view.
Step 6 Call specific LayoutManager
Here I would be calling specific LayoutManager that is requested from MainActivity.java file.
6.1 Set layout for StaggeredGridLayoutManager
private void setStaggeredGridLayoutManager() {
    recyclerViewMain.setHasFixedSize(true);
    mLayoutManager = new StaggeredGridLayoutManager(2, GridLayoutManager.VERTICAL);
    recyclerViewMain.setLayoutManager(mLayoutManager);
    adapter = new StaggeredGridLayoutAdapter(this, images);
}
Here I am creating an object of StaggeredGridLayoutManager and set it as a LayoutManager to RecycleView. Set the adapter (i.e. StaggeredGridLayoutAdapter). setHasFixedSize() is used to let the RecyclerView know that size will keep the same.
StaggeredGridLayoutManager() will take two arguments as following:
- Number of grid
- layout orientation
setLayoutManager() method will set my StaggeredGridLayoutManager as a LayoutManager to RecyclerView.
- recyclerViewMain.setLayoutManager(mLayoutManager)
I would be creating an object of adapter and pass object of activity and ArrayList of image URLs.
6.2 Set Layout for GridLayoutManager
Set Layout for GridLayoutManager
private void setGridLayoutManager() {
    recyclerViewMain.setHasFixedSize(true);
    mLayoutManager = new GridLayoutManager(this, 2);
    recyclerViewMain.setLayoutManager(mLayoutManager);
    adapter = new GridLayoutAdapter(this, images);
}
6.3 Set Layout for LinearLayoutManager
private void setLinearLayoutManager() {
    recyclerViewMain.setHasFixedSize(true);
    mLayoutManager = new LinearLayoutManager(this);
    recyclerViewMain.setLayoutManager(mLayoutManager);
    adapter = new LinearLayoutAdapter(this, images);
}
RecyclerViewDisplayActivity.java
package com.theappguruz.recycleviewdemo.activity;
import android.os.Bundle;
import android.support.v7.app.AppCompatActivity;
import android.support.v7.widget.GridLayoutManager;
import android.support.v7.widget.LinearLayoutManager;
import android.support.v7.widget.RecyclerView;
import android.support.v7.widget.StaggeredGridLayoutManager;
import com.theappguruz.recycleviewdemo.R;
import com.theappguruz.recycleviewdemo.adapter.GridLayoutAdapter;
import com.theappguruz.recycleviewdemo.adapter.LinearLayoutAdapter;
import com.theappguruz.recycleviewdemo.adapter.StaggeredGridLayoutAdapter;
import com.theappguruz.recycleviewdemo.constant.Constant;
import com.theappguruz.recycleviewdemo.recycleview.CustomRecyclerViewAdapter;
import com.theappguruz.recycleviewdemo.recycleview.SpaceItemDecoration;
import java.util.ArrayList;
/**
 * Created by Nikunj Popat on 16-12-2015.
 */
public class RecyclerViewDisplayActivity extends AppCompatActivity {
    private RecyclerView recyclerViewMain;
    private ArrayList<String> images = new ArrayList<>();
    private RecyclerView.LayoutManager mLayoutManager;
    CustomRecyclerViewAdapter adapter;
    @Override
    protected void onCreate(Bundle savedInstanceState) {
        super.onCreate(savedInstanceState);
        setContentView(R.layout.activity_recycler_view_display);
        getWidgets();
        initializeImages();
        getLayoutManagerRequest();
    }
    private void getWidgets() {
        recyclerViewMain = (RecyclerView) findViewById(R.id.my_recycler_view);
    }
    private void getLayoutManagerRequest() {
        if (getIntent().getStringExtra(Constant.LAYOUT_MANAGER).equals(Constant.STAGGERED_LAYOUT_MANAGER)) {
            setStaggeredGridLayoutManager();
            setAdapter();
        } else if (getIntent().getStringExtra(Constant.LAYOUT_MANAGER).equals(Constant.GRID_LAYOUT_MANAGER)) {
            setGridLayoutManager();
            setAdapter();
        } else if (getIntent().getStringExtra(Constant.LAYOUT_MANAGER).equals(Constant.LINEAR_LAYOUT_MANAGER)) {
            setLinearLayoutManager();
            setAdapter();
        }
    }
    private void initializeImages() {
        images = new ArrayList<>();
        for (int i = 0; i < Constant.IMAGES.length; i++) {
            images.add(Constant.IMAGES[i]);
        }
    }
    private void setStaggeredGridLayoutManager() {
        recyclerViewMain.setHasFixedSize(true);
        mLayoutManager = new StaggeredGridLayoutManager(2, GridLayoutManager.VERTICAL);
        recyclerViewMain.setLayoutManager(mLayoutManager);
        adapter = new StaggeredGridLayoutAdapter(this, images);
    }
    private void setGridLayoutManager() {
        recyclerViewMain.setHasFixedSize(true);
        mLayoutManager = new GridLayoutManager(this, 2);
        recyclerViewMain.setLayoutManager(mLayoutManager);
        adapter = new GridLayoutAdapter(this, images);
    }
    private void setLinearLayoutManager() {
        recyclerViewMain.setHasFixedSize(true);
        mLayoutManager = new LinearLayoutManager(this);
        recyclerViewMain.setLayoutManager(mLayoutManager);
        adapter = new LinearLayoutAdapter(this, images);
    }
    private void setAdapter() {
        recyclerViewMain.setAdapter(adapter);
    }
}
I hope you find this blog post very helpful while with RecyclerView. Let me know in comment if you have any questions RecyclerView. I will reply you ASAP.
Learning Android sounds fun, right? Why not check out our other Android Tutorials?
Got an Idea of Android App Development? What are you still waiting for? Contact Us now and see the Idea live soon. Our company has been named as one of the best Android Application Development Company in India.

I am 3D Game Developer and Android Developer with an aspiration of learning new technology and creating a bright future in Information Technology.