Be patient..... we are fetching your source code.
Objective
The main objective of this blog post is to give you an idea about how to create Xcode Project in iOS
"Objective-C/Swift is a programming language you use when writing software for OS X and iOS. Xcode is an editor, which is available for iOS application development."
There are many versions of Xcode are available but if you want to develop application with Swift Programming language then your Xcode version must be 6 or higher than 6 is required. Here I am using "Xcode Version 6.3.2".
For iOS application development you must have:
- Mac OS
- Xcode (Any version as per your requirements)
Now, lets start with creating Xcode project.
Step 1 About Xcode Editor
Once you have installed Xcode in your mac, it will install Xcode editor as well as simulator.
1) Xcode Editor looks like:

2) Xcode Simulator looks like:

Step 2 Welcome To Xcode
Now, click on left side icon (Xcode Editor) or press "Cmd+Space" and type xcode & enter.
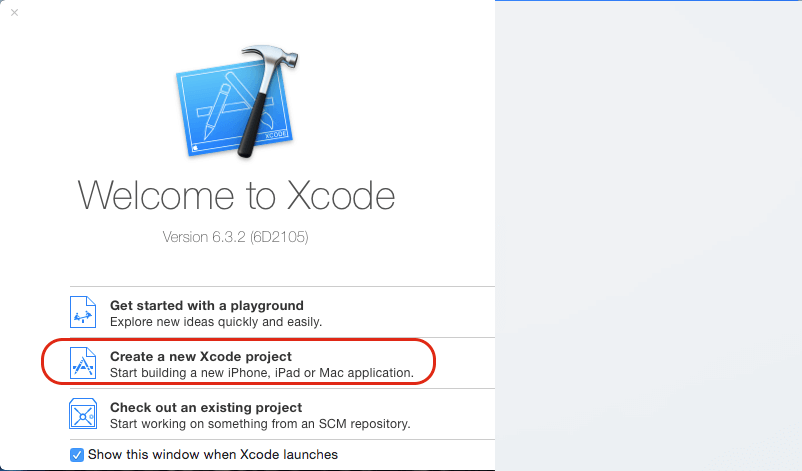
It’s open Xcode, which is looks like:

[Xcode Opening Screen]
As per the Xcode Opening Screen, There are 3 options for creating a project.
1. Get started with a playground:
- This option is used for beginner of Swift developer, who can play with Swift code on playground provided by Apple and practice with Swift programming on it.
2. Create a new Xcode project:
- This option is use for creating a new Xcode project for all iOS application developer. We use this option for creating Xcode project in our blog.
3. Check out an exisiting project:
- It is used for opening an existing project.
Step 3 Xcode Project Template Screen
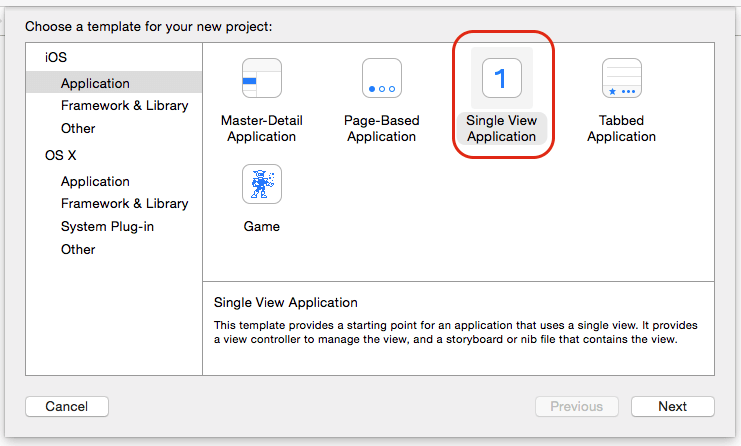
Now, click on "Create a new Xcode project". It’s open project template screen, This is use for opening an exisiting project if you had created before in your system.

[Xcode project template screen]
Here, Many project templates are available in Xcode. These templates are used for creating iOS Application. As per your requirements choose any one template suitable for your application. Select template and read below description. Here we select "Single View Application" template and press next.
Step 4 Xcode Project Description
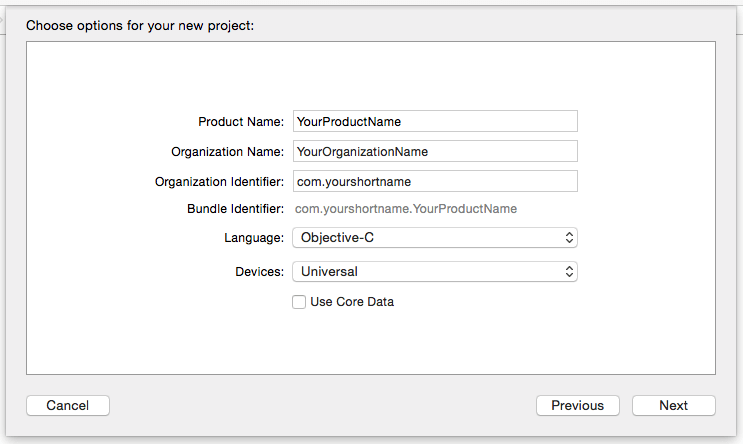
Now, project detail window are open. There are many fields, which you can fill as per your requirements.
It’s looks like:

[Xcode project details screen]
Here, Fill following fields as per your requirements:
- Product name.
- Organization name.
- Organization identifier. (Here, identifier should be with standard format like com.yourcompnyshortname)
- Bundle identifier field. (which is automatically generated).
- Choose Language, if you want to create iOS applcation in Swift programming langauge than choose here Swift Option otherwise choose Objective-C option.
- Choose Devices.
- One for only iPhone Application.
- Second for only iPad Application.
- Third for Universal Application (iPhone and iPad both). Choose any one and click next button.
Step 5 Xcode Project Repository
Now, Xcode ask for path where to create this project. Choose your destination path and click on Create button. Finally on your destination path project has been created.
Now, on your destination path, there are two folder and one file with extension ".xcodeproj" are created.
It looks like:

Always, open ".xcodeproj" extension file for direct open your Xcode project.
Got an Idea of iPhone App Development? What are you still waiting for? Contact us now and see the Idea live soon. Our company has been named as one of the best iPhone App Development Company in India.

I am iOS Application Developer & I personally believed that When a programming language is created that allows programmers to program in simple English, it will be discovered that programmers cannot speak English.
