
Be patient..... we are fetching your source code.
- Create Xcode Project
- Create Facebook App & Get App ID
- Add FBSDKLoginKit & FBSDKCoreKit Frameowrks
- Set Facebook App ID in info.plist
- Add Bridging header file
- AppDelegate.swift file
- Design User Interface
- Configure Facebook Login
- FBSDKLoginButtonDelegate Method
- Get Facebook User profile Data
- Facebook Logout
- Build & Run the Demo
Objective
The main objective of this post is to learn Facebook Integration in Swift 2.
Output:
I would be implementing following features in my example for this blog post:
- Login into Facebook directly through the application.
- Fetch details of user.
- Logout from Facebook directly through the application.
Introduction:
Facebook API gives you access to following features when you want to integrate Facebook in your iOS Application.
- Provides interface and programmatic access to read / write data to Facebook.
- Identify Facebook applications and user using Facebook API key.
- Read user profile First of all, we’ll need to do login into Facebook.
Once login has been successful, Facebook API will provide token which is useful to fetch further data from Facebook.
In General, you can also provide direct login to Facebook through your iOS application with the help of this tutorial.
Step 1 Create Xcode Project
I would be creating "Swift Facebook Integration" Xcode project for this demo.
If you are beginner and don’t have any idea about "How to create Xcode project?" then first refer following blog:
Step 2 Create Facebook App & Get App ID
To create Facebook Application please follow the steps given below:
- Go to Facebook Developers page.
- Log In into your Facebook Account.
- Go to "My Apps".

- To create new Facebook app, click on "Add a New App" button.
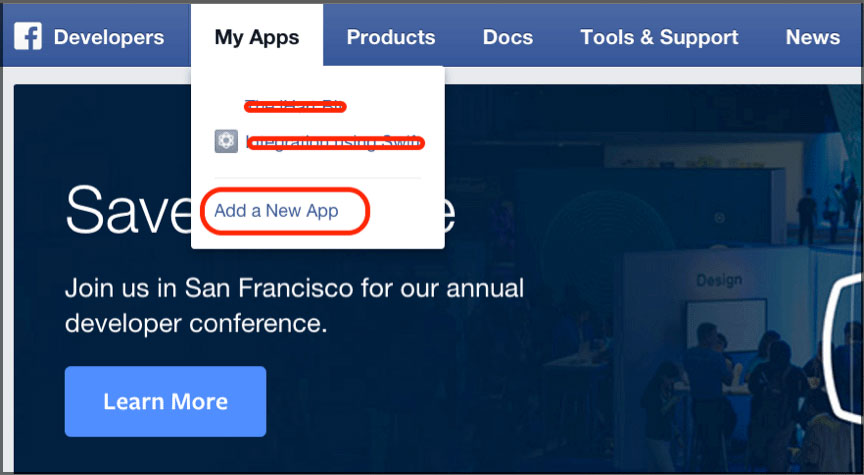
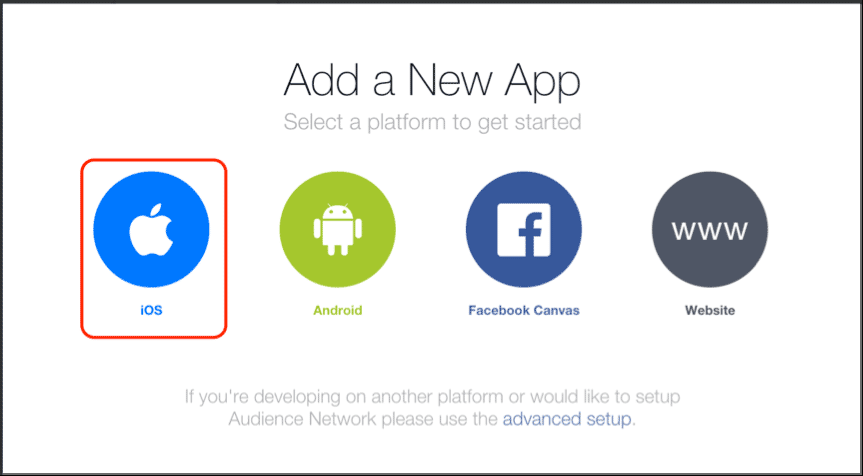
- Select a Platform: "iOS".
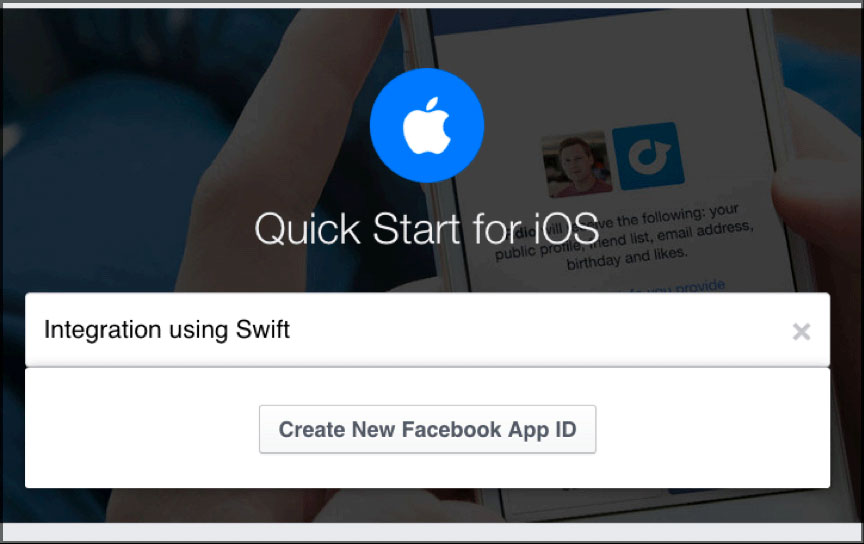
- Give appropriate name of the App and click on "Create New Facebook App ID".
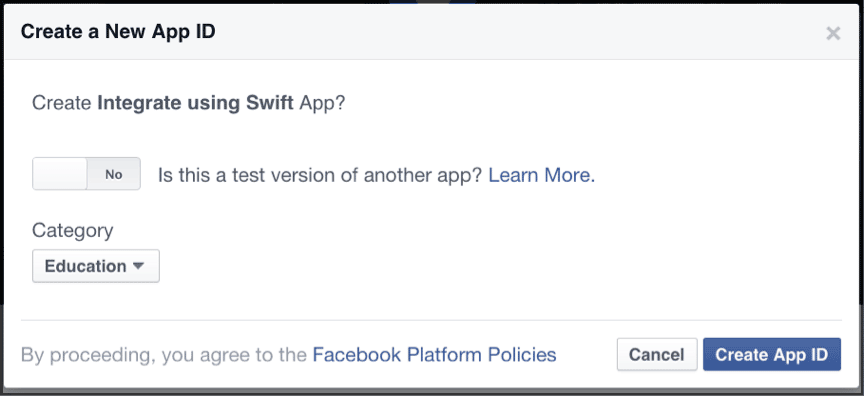
- Choose your Category and click on "Create App".
- Scroll to bottom and set your project’s bundle identifier and click on next.
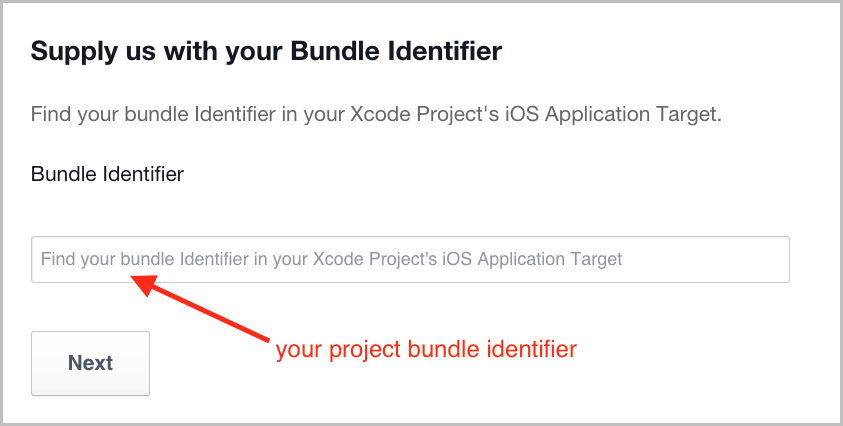
- Now, go to your App Dashboard.
- It contains information regarding "App ID, API version" and "App Secret" that is used further in demo example.
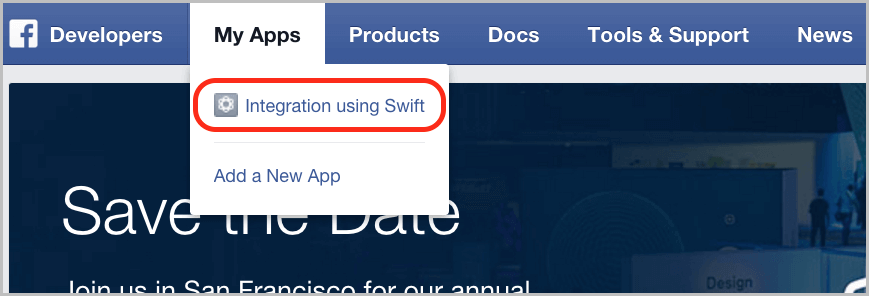
- Finally, your Facebook App ID should look like:

Step 3 Add FBSDKLoginKit & FBSDKCoreKit Frameworks
There are various versions available of Facebook SDK. Here, I would be using Facebook SDK version 4.8.0 for this demo.
Refer following steps to add framework:
- In Xcode, Go to File >> Add files to Project
- Select FBSDKLoginKit.framework and FBSDKCoreKit.framework from the directory you just download.
- Make sure "Copy items if needed is checked".
- Click on "Add".
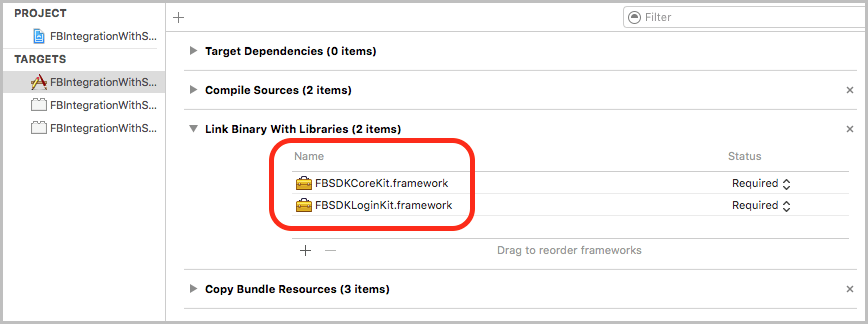
Step 4 Set Facebook App ID in info.plist
Here we must set returning URL or redirect URL to info.plist file. It is used to redirect from Facebook app to our demo example once user is successfully logged in. I would be setting numbers of fields in info.plist.
They are as following:
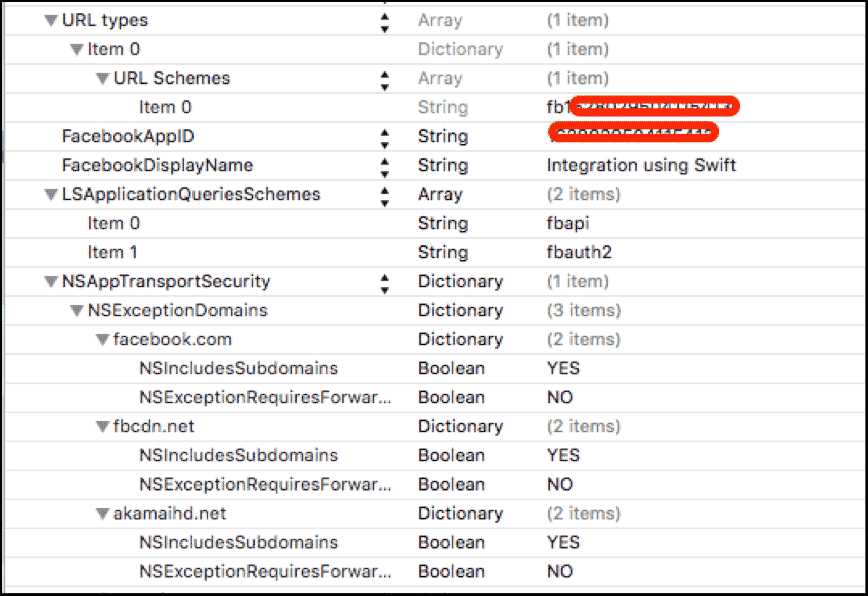
You can also do it using alternate method as follows:
- Go to Project navigation bar (left-side panel)
- Right click on info.plist file.
- Select "Open As" and click on "Source Code".
- Place the code between <dict> & </dict> with the following.
<key>CFBundleURLTypes</key>
	<array>
		<dict>
			<key>CFBundleURLSchemes</key>
			<array>
				<string>fb+”YOUR Facebook APP ID”</string>
			</array>
		</dict>
	</array>
	<key>FacebookAppID</key>
	<string>”YOUR Facebook APP ID”</string>
	<key>FacebookDisplayName</key>
	<string>Integration using Swift</string>
	<key>LSApplicationQueriesSchemes</key>
	<array>
		<string>fbapi</string>
		<string>fbauth2</string>
	</array>
	<key>NSAppTransportSecurity</key>
	<dict>
		<key>NSExceptionDomains</key>
		<dict>
			<key>facebook.com</key>
			<dict>
				<key>NSIncludesSubdomains</key>
				<true/>
				<key>NSExceptionRequiresForwardSecrecy</key>
				<false/>
			</dict>
			<key>fbcdn.net</key>
			<dict>
				<key>NSIncludesSubdomains</key>
				<true/>
				<key>NSExceptionRequiresForwardSecrecy</key>
				<false/>
			</dict>
			<key>akamaihd.net</key>
			<dict>
				<key>NSIncludesSubdomains</key>
				<true/>
				<key>NSExceptionRequiresForwardSecrecy</key>
				<false/>
			</dict>
		</dict>
	</dict>
- Replace "YOUR FB APP ID with FB" prefix in key "CFBundleURLSchemes".
<key>CFBundleURLTypes</key>
	<array>
		<dict>
			<key>CFBundleURLSchemes</key>
			<array>
				<string>”fb + YOUR FB APP ID”</string>
			</array>
		</dict>
	</array>
- Replace "YOUR FB APP ID" in key "FacebookAppID".
<key>FacebookAppID</key>
<string>"YOUR FB APP ID"</string>
- Replace "YOUR FB DISPLAY" Name in key "FacebookDisplayName".
<key>FacebookDisplayName</key>
<string>YOUR FB DISPLAY NAME</string>
Step 5 Add Bridging header file
Add FBIntegrationWithSwift-Bridging-Header (Objective C to Swift Wrapper).
If you have no idea about "How to add bridging header?" refer the following blog.
Import FBSDK Login and Core kit
#import <FBSDKCoreKit/FBSDKCoreKit.h>
#import <FBSDKLoginKit/FBSDKLoginKit.h>
Step 6 AppDelegate.swift file
To configure Facebook with your application, write the following line of code in didFinishLaunchingWithOptions.
func application(application: UIApplication, didFinishLaunchingWithOptions launchOptions: [NSObject: AnyObject]?) -> Bool
{
        // Override point for customization after application launch.

        return FBSDKApplicationDelegate.sharedInstance().application(application, didFinishLaunchingWithOptions: launchOptions)
}
I would be using following line of code in applicationWillTerminate to sign-out from Facebook once user terminate the application.
func applicationWillTerminate(application: UIApplication)
{
        // Called when the application is about to terminate. Save data if appropriate. See also applicationDidEnterBackground:.

        let loginManager: FBSDKLoginManager = FBSDKLoginManager()
        loginManager.logOut()
}
Add method openURL, it is used to control flow once user successfully logged in through Facebook and returning back to demo application.
func application(application: UIApplication, openURL url: NSURL, sourceApplication: String?, annotation: AnyObject) -> Bool
{
        return FBSDKApplicationDelegate.sharedInstance().application(application, openURL: url, sourceApplication: sourceApplication, annotation: annotation)
}
Step 7 Design User Interface
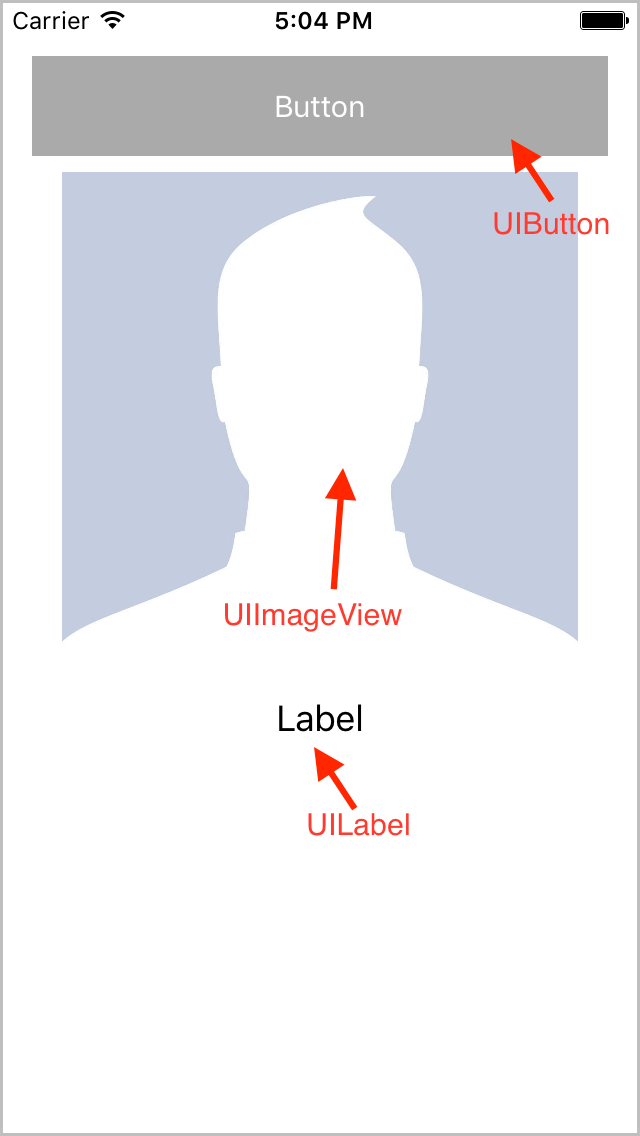
Set "FBSDKLoginButton" as a custom class of UIButton.
You can get more idea about it from following:

Create control outlet in your ViewController.swift file.
It looks like:
@IBOutlet var btnFacebook: FBSDKLoginButton!
@IBOutlet var ivUserProfileImage: UIImageView!
@IBOutlet var lblName: UILabel!
You can learn more about designing user interface from following Article:
Step 8 Configure Facebook Login
Configure Facebook in ViewController.swift file as following.
func configureFacebook()
{
        btnFacebook.readPermissions = ["public_profile", "email", "user_friends"];
        btnFacebook.delegate = self
}
Step 9 FBSDKLoginButtonDelegate Method
To handle successful login and logout, Facebook SDK provides delegate method for FBSDKLoginButton.
import UIKit
class ViewController: UIViewController, FBSDKLoginButtonDelegate
Now, There are 2 methods of FBSDKLoginButtonDelegate.
1st Method:
func loginButton(loginButton: FBSDKLoginButton!, didCompleteWithResult result: FBSDKLoginManagerLoginResult!, error: NSError!)
{}
2nd Method:
func loginButtonDidLogOut(loginButton: FBSDKLoginButton!)
{}
Step 10 Get Facebook User profile Data
Once user is logged in successfully, I would be getting data of user profile in delegate methods of FBSDK.
Here, I am fetching 3 fields:
- First Name
- Last Name
- Profile Picture
func loginButton(loginButton: FBSDKLoginButton!, didCompleteWithResult result: FBSDKLoginManagerLoginResult!, error: NSError!)
{
        FBSDKGraphRequest.init(graphPath: "me", parameters: ["fields":"first_name, last_name, picture.type(large)"]).startWithCompletionHandler { (connection, result, error) -> Void in

            let strFirstName: String = (result.objectForKey("first_name") as? String)!
            let strLastName: String = (result.objectForKey("last_name") as? String)!
            let strPictureURL: String = (result.objectForKey("picture")?.objectForKey("data")?.objectForKey("url") as? String)!

            self.lblName.text = "Welcome, \(strFirstName) \(strLastName)"
            self.ivUserProfileImage.image = UIImage(data: NSData(contentsOfURL: NSURL(string: strPictureURL)!)!)
        }
}
Step 11 Facebook Logout
When user click on "Logout Button", application will sign out user from Facebook through following delegate method.
func loginButtonDidLogOut(loginButton: FBSDKLoginButton!)
{
        let loginManager: FBSDKLoginManager = FBSDKLoginManager()
        loginManager.logOut()

        ivUserProfileImage.image = nil
        lblName.text = ""
}
Step 12 Build & Run the Demo

Now click on "Log in with Facebook" button Enter your Facebook credential and Allow permission for this application.

I hope you will find this post very useful while working with Facebook integration in Swift 2. Let me know in comment if you have any questions regarding in Swift. I will reply you ASAP.
Got an Idea of iPhone App Development? What are you still waiting for? Contact us now and see the Idea live soon. Our company has been named as one of the best iPhone App Development Company in India.

Being an iOS developer with experience of 3 years feels pretty awesome because much more than just playing around with code, software developers are the brains behind the design, installation, testing and maintenance of software systems.
