To download the code, login with one of the following social providers.
Login
Be patient..... we are fetching your source code.
Objective
The main objective of this blog post is to give you an idea about Strategy Pattern to understand why you should use it and how to implement this pattern in Unity.
Step 1 Introduction
Don't know anything about patterns?
Don't know how strategy pattern works?
Wondering why you should use it in your game?
No worries. You'll know everything about strategy pattern after reading this post. (I'm assuming you know about Inheritance and Interfaces from OO concepts already).
It is going to be a long journey but I am sure it will be worth your while.
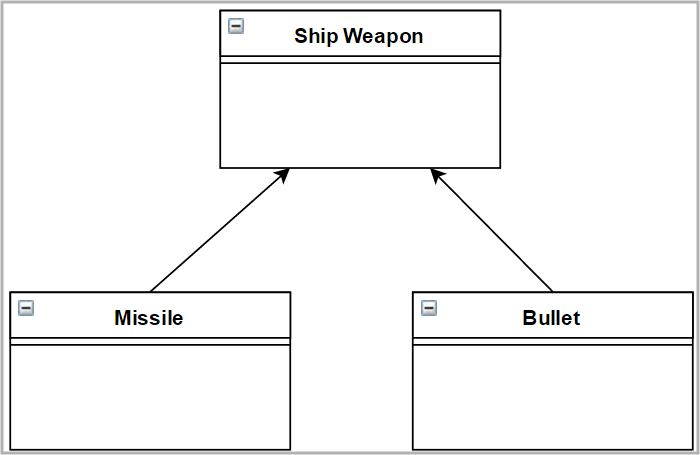
So, let's talk about a game scenario: we have a spaceship; it has multiple weapons like missiles, bombs, bullets and many more.
We will focus on just two of them for now, i.e. missiles and bullets.
Step 2 Inheritance
Since missile (and bullet) IS-A weapon, we can use the concept of Inheritance in our game.
It will be something like:
That was easy. Now we want to add more types of bullets and missiles.
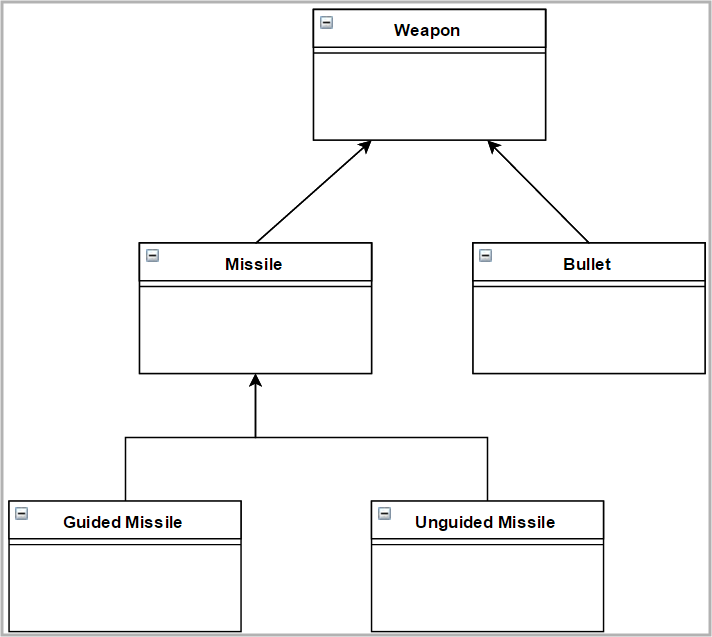
Now it has one more level of inheritance.
"So what? Managing a 3 level inheritance is not a big deal."
Before you say that, let me point out an issue to you. Say if we have any Fire() method in our weapon class. We will need to override this method in all of its subclasses.
Because all missiles and bullets have different mechanism for firing.
And what if we have something like this?
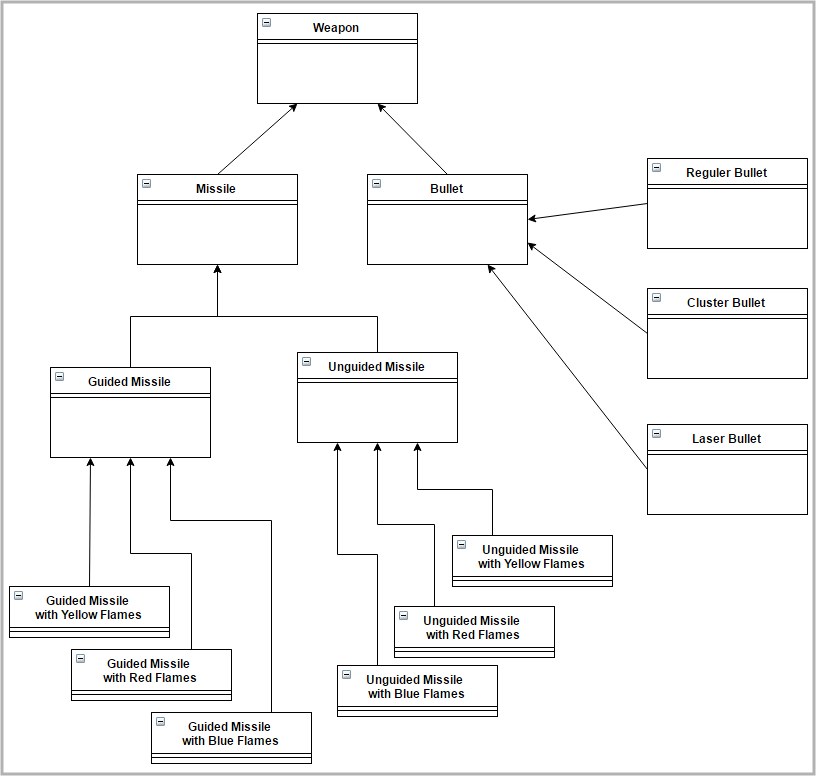
As we are talking about games here, requirements for new features and extensions can come at any time.
If we rely only on inheritance, code will be very difficult to handle to handle.
THEN THERE'S NO POINT OF USING INHERITANCE ANYMORE..!
Yeah, inheritance won’t help, what can we do now?
Note
I AM NOT SAYING INHERITANCE IS BAD! IT JUST DOES NOT FIT IN OUR CASE
Step 3 Interfaces
Yes, perhaps interfaces can help us in this situation. We can create multiple interfaces and implement them wherever we need.
Let’s take a sample,
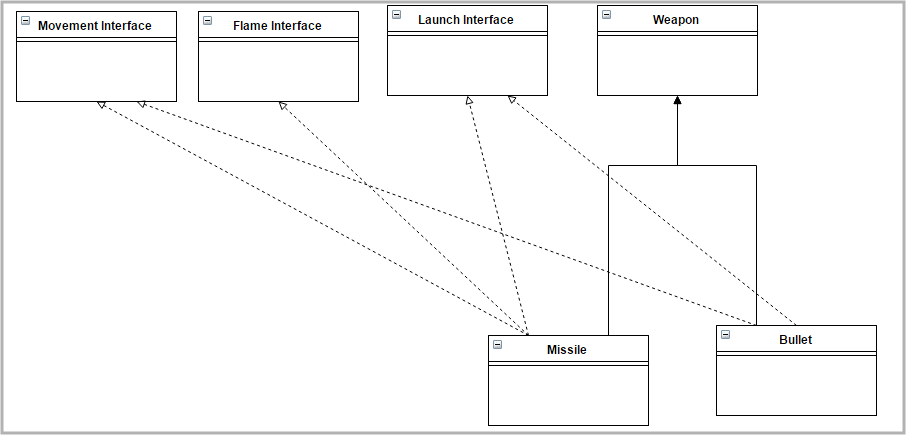
We need a guided missile with red flames and an unguided one with blue flames. That’s easy to implement by interfaces. Imagine we need a guided missile with blue flames now.
What we’ll do?
You may say, "Implement that Flame interface, you dummy!"
But, we’ve already implemented that interface once.
This way, we’ve to implement interfaces each time we want a specific behavior.
We used interfaces to avoid troubles in inheritance, and now we’re stuck with a code structure which is not reusable at all..!!
“OMG! OO concepts have failed to solve our problem. What should we do now?”
Relax. That’s not the thing.
We just need to use a different way of using inheritance and interfaces to solve our problem efficiently.
Step 4 Strategy Pattern
This different way is the Strategy Pattern. Before executing anything.
Let's see the definition first,
"In computer programming, the strategy pattern (also known as the policy pattern) is a software design pattern that enables an algorithm's behavior to be selected at run-time"
Woah..! That was a Bouncer..!
Hold on, let me simplify the definition for you.
This design pattern is useful when you have to deal with multiple choices of behaviors for a single gameobject.
Let me tell you how strategy pattern solves our problem here before we start coding. Instead of using interfaces directly, we create concrete classes first and then use them as per our need.
Then the initial diagram will be like:
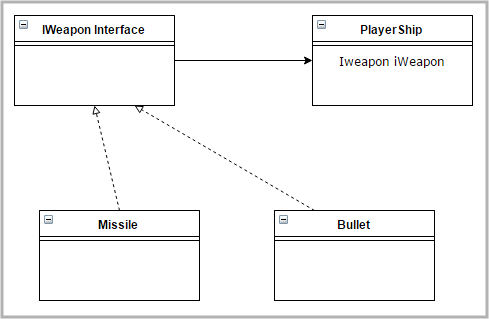
If you want to add more subtypes, simply create a new concrete class and use it. Hence we can now easily extend our code without any worries.
Yeah, that’s a relief.
Step 5 Implementation
Now let’s do some coding.
Follow the steps to setup the project.
5.1 Scene Setup
Insert a spaceship, a bullet and a missile image in your scene view. You can select any of your favorite images.
- Add RigidBody2D component to both bullet and missile images. Make prefabs of bullet and missile by dragging them to assets tab.
- Delete bullet and missile objects from your scene, you don't need them anymore.
- Create a folder named "Resources" and move prefabs into it. The folder name MUST be named "Resources". Or else our code won’t work properly.
- Create 2 particle systems that look like our ship’s exhaust flame (You can select any relative images if you don’t want to use particle systems for now).
- Make prefabs of both flames and delete them from hierarchy. Or keep any one of them to get the effect from the very beginning. Keep your flame object as a child to ship object.
5.2 WeaponManager Script
Create a script. I prefer it in C#. You can also try in JavaScript.
Select a name for it as you like.
WeaponManager.cs
using UnityEngine;
using System.Collections;

public class WeaponManager : MonoBehaviour {
}


public interface IWeapon{
	void Shoot();
}

public class Bullet: MonoBehaviour, IWeapon{
	public void Shoot(){

		Vector3 initialPosition = new Vector3 (this.transform.position.x, this.transform.position.y +1f,0);
		GameObject bullet =  Instantiate(Resources.Load("BulletPrefab",typeof(GameObject))) as GameObject;
		bullet.transform.position = initialPosition;
		bullet.GetComponent<Rigidbody2D>().velocity = new Vector2(0f,3f);
	}
}

public class Missile: MonoBehaviour, IWeapon{
	public void Shoot(){

		Vector3 initialPosition = new Vector3 (this.transform.position.x, this.transform.position.y + 1f,0);
		GameObject missile =  Instantiate(Resources.Load("MissilePrefab",typeof(GameObject))) as GameObject;
		missile.transform.position = initialPosition;
		missile.GetComponent<Rigidbody2D>().velocity = new Vector2(0f,3f);

	}
}
Initially, I've create an interface IWeapon to implement shooting behavior. There's a method Shoot() in it. We will override this method later to implement shooting logic.
Two concrete classes, Bullet and Missile implement the interface.
I believe the shooting logic I’ve used here is very easy for you to understand.
Still in case you don’t get any part of it, you know how to get to me (Yes! in comments section :) ).
One more thing you should keep in mind.
Both shooting logic may be the same in the code; in real situations they are completely different. You can implement a whole different logic in both.
I’ve kept them same for the sake of simplicity.
5.3 FlameManager Script
using UnityEngine;
using System.Collections;

public class FlameManager : MonoBehaviour {
}

public interface IFlame{

	void ShowFlame();
}

public class BlueFlame:MonoBehaviour,IFlame{

	public void ShowFlame(){
		GameObject blueFlame = Instantiate(Resources.Load("Flame-blue",typeof(GameObject))) as GameObject;
		blueFlame.transform.parent=transform;
	}
}

public class RedFlame:MonoBehaviour,IFlame{

	public void ShowFlame(){
		GameObject redFlame = Instantiate(Resources.Load("Flame-red",typeof(GameObject))) as GameObject;
		redFlame.transform.parent=transform;
	}
}
This script is quite similar to WeaponManager.cs. One interface and two concrete classes to implement flame behavior.
5.4 ShipController Scritp
Now create a new script and place the following code in it. You can select any name you like. I’m using ShipControl as script’s name. Attach this script to your spaceship gameobject.
ShipCotnroler.cs
using UnityEngine;
using System.Collections;

public enum WeaponType{
	Missile,
	Bullet
}

public enum Flame{
	Blue,
	Red
}

public class ShipControler : MonoBehaviour {

	#region variables
	public WeaponType weaponType;
	public Flame flameColor;

	private IWeapon iWeapon;
	private IFlame iFlame;
	#endregion

	private void HandleWeaponType(){

		//To prevent Unity from creating multiple copies of the same component in inspector at runtime
		Component c = gameObject.GetComponent<IWeapon>() as Component;

		if(c!=null){
				Destroy(c);
		}

		#region Strategy
		switch(weaponType){

			case WeaponType.Missile:
				iWeapon = gameObject.AddComponent<Missile> ();
				break;

			case WeaponType.Bullet:
				iWeapon = gameObject.AddComponent<Bullet> ();
				break;

			default:
				iWeapon = gameObject.AddComponent<Bullet> ();
				break;
		}
		#endregion
	}

	public void HandleFlameColor(){

		Component c = gameObject.GetComponent<IFlame>() as Component;

		if(c!=null){
			Destroy(c);
			iFlame.DestroyFlame(); // so that number of flame objects remains one
		}

		#region Strategy
		switch(flameColor){

		case Flame.Blue:
			iFlame = gameObject.AddComponent<BlueFlame> ();
			break;

		case Flame.Red:
			iFlame = gameObject.AddComponent<RedFlame> ();
			break;

		default:
			iFlame = gameObject.AddComponent<BlueFlame> ();
			break;
		}
		#endregion

	}

	public void Fire(){
		iWeapon.Shoot();
	}

	void Start(){

		HandleWeaponType(); //to check the value of weaponType in the inspector initially
		HandleFlameColor();
		iFlame.ShowFlame();
	}

	void Update () {

		if (Input.GetKeyDown(KeyCode.Space)){
			Fire();
		}

		//to check the value of weaponType in the inspector while in play mode
		if(Input.GetKeyDown(KeyCode.C)){
			HandleWeaponType();
		}

		if (Input.GetKeyDown(KeyCode.F)){
			HandleFlameColor();
			iFlame.ShowFlame();
		}
	}
}
You can see an enum WeaponType and enum Flame with 2 constants each.
| HandleWeaponType() Method | 1st part is to prevent Unity from creating multiple copies of the same component while in play mode.
It stores the component of IWeapon type and when the method is called again to create a new one, it destroys the previous component. You will see this effect in the inspector of your spaceship gameobject during play mode. Now we check the value of weaponType in a switch case statement. As you can see, Missile or Bullet component is assigned to iWeapon in respective case. |
| HandleShipFlame() Method | Similar to HandleWeaponType() method to manage the flames. |
| Fire() Method | To invoke Shoot() method of interface IWeapon. |
| Start() Method | To invoke HandleWeaponType() and HandleShipFlame() methods initially. |
| Update() Method | To invoke HandleWeaponType() and HandleShipFlame() methods when following conditions are satisfied.
|
Note
This is actually not a very robust method of implementing Strategy Pattern; this example is structured in a simple way for better understanding. I am sure you will be able to figure out proper implementation structure as per your need.
OK now Save everything and hit the play button now. It’s time to see all that hard work in action!
In editor window, you can switch the values for weaponType and flameColor in inspector of spaceship gameobject.
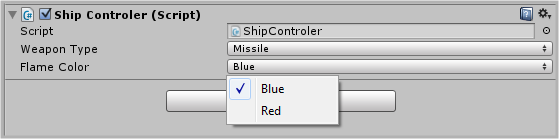
You can choose the weapon for the spaceship from here.
See the effect of our HandleWeaponType() and HandleFlameColor() method here.
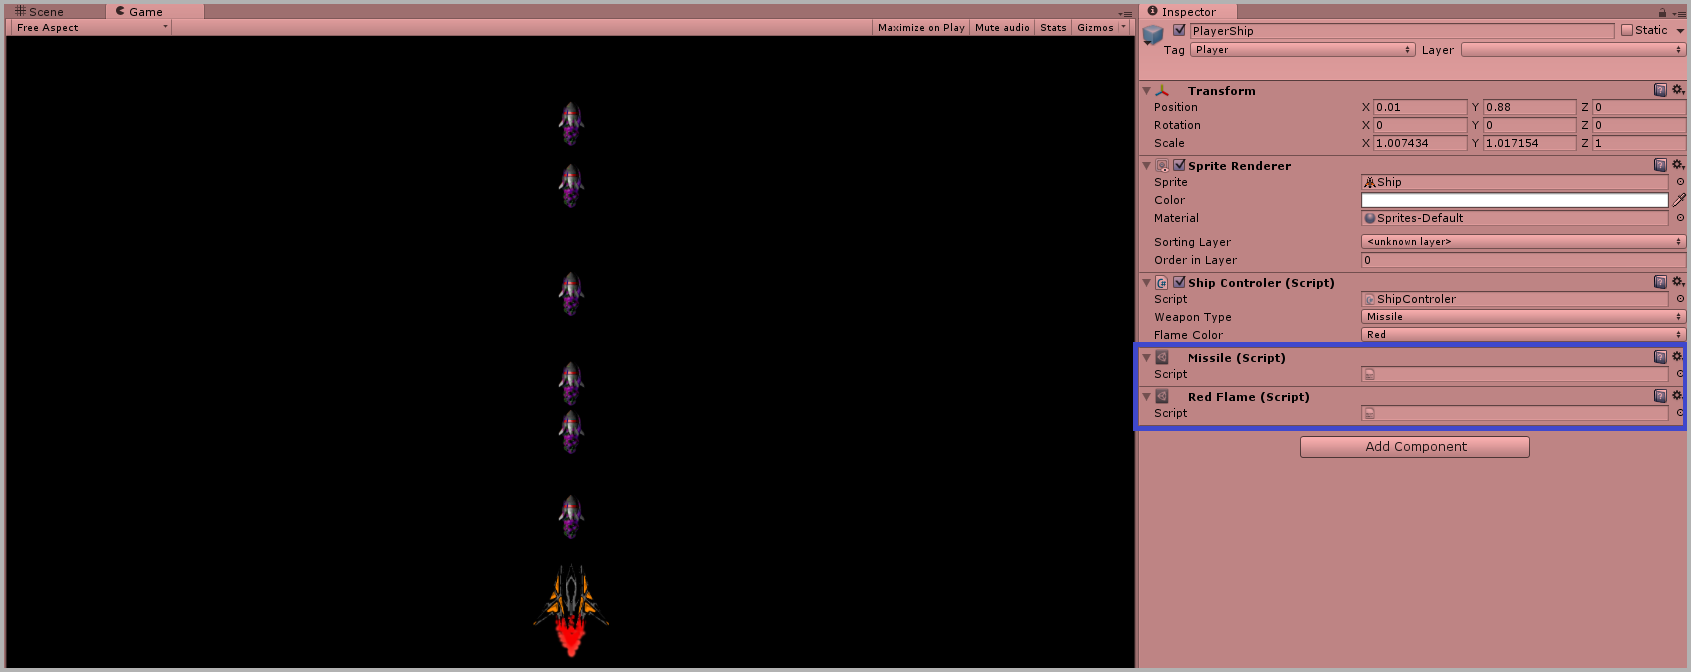
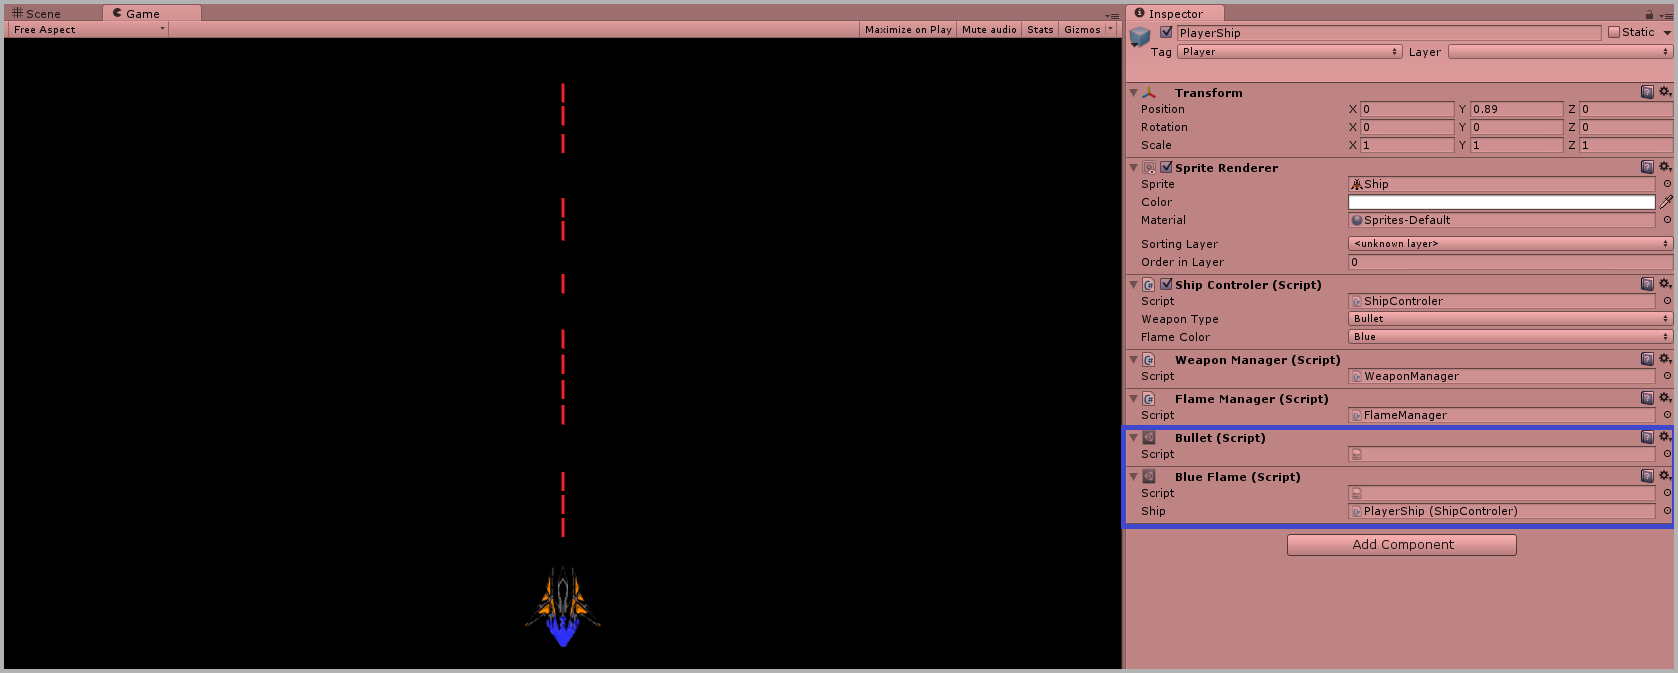
When the Weapon Type is Missile, Missile script from WeaponManager is added as component. And, when Bullet is selected Bullet script is attached to the inspector.
The process for flames is the same as weapons. As you can see in the game window (hopefully on your editor too), bullets and missiles are firing from our ship. And also notice the change in flame
AND THAT’S HOW WE ACHIVED A WORKING STRATEGY PATTERN IMPLEMENTATION...!
"YEAH! I CAN NOW USE STRATAGY PATTERN IN MY PROJECT."
I believe you can say that too now.
Though, you have just implemented this pattern, you should do some more examples to master it.
Let me give you some self-exercise for that,
- Extend this project and add two more missile types with different flames in them.
What are you waiting for now?
Go ahead and implement this pattern in your own game.
If you still have any doubts about strategy pattern, let me know in the comments below & I'll get back to you.
Learning Unity sounds fun, right? Why not check out our other Unity Tutorials?
Got an Idea of Game Development? What are you still waiting for? Contact us now and see the Idea live soon. Our company has been named as one of the best Unity 3D Game Development Company in India.

An Addictive Gamer turned into a Professional Game Developer. I work with Unity Engine. Part of TheAppGuruz Team. Ready to take on Challenging Games & increase my knowledge about Game Development.