To download the code, login with one of the following social providers.
Login
Be patient..... we are fetching your source code.

Objective
The main objective of this blog post is to make a basic level generator and editor for a 2d platformer in Unity.
Got tired of your complicated Level Editor?
Searching for a fast way to create & test new levels in your platformer game?
or
Looking somewhere to start level designing?
Then this is where your search ends!
Here, I’m gonna show you a super fast way to generate and modify levels for a 2d platformer in Unity Engine.
And that too in a colorful way. :D
(you’ll know what I mean as you go down the blog) ;)
The tools you’ll need apart from Unity is any photo editing software.
I’m using Photoshop.
So without any more delay, let's dive into it.
Step 1 Scripting
LevelGenerator.cs
using UnityEngine;

public class LevelGenerator : MonoBehaviour
{

    public Texture2D mapTexture;
    public PixelToObject[] pixelColorMappings;

    private Color pixelColor;

    void Start ()
    {
        GenerateLevel ();
    }

    void GenerateLevel ()
    {
        // Scan whole Texture and get positions of objects
        for (int i = 0; i < mapTexture.width; i++) {
            for (int j = 0; j < mapTexture.height; j++) {
                GenerateObject (i, j);
            }
        }
    }

    void GenerateObject (int x, int y)
    {
        // Read pixel color
        pixelColor = mapTexture.GetPixel (x, y);

        if (pixelColor.a == 0) {
            // Do nothing
            return;
        }

        foreach (PixelToObject pixelColorMapping in pixelColorMappings) {
            // Scan pixelColorMappings Array for matching color maping
            if (pixelColorMapping.pixelColor.Equals (pixelColor)) {
                Vector2 position = new Vector2 (x, y);
                Instantiate (pixelColorMapping.prefab, position, Quaternion.identity, transform);
            }
        }
    }
}
As you can see, we have a public Texture2D variable to store the image file we’ll paint in next step.
Now, our first method is GenerateLevel().
We’re running 2 for loops to scan the whole texture. By this, we’ll get color data of each pixel in RGBA format.
After getting the color data of a pixel, the only thing left to do is to generate an object at that point/position.
In this demo, I’m generating ground, coins and character spawn positions. For each element, we’ll need a distinct color.
Let’s say we want to set a green color for ground and yellow for coins.
How do we achieve that?
For that, we’ll create another class PixelToObject.
PixelToObject.cs
using UnityEngine;

[System.Serializable] // To get access in Inspector
public class PixelToObject
{
    public Color pixelColor;
    public GameObject prefab;

}
It contains 2 variables of type Color and GameObject as its variables.
Remember to make it serializable so that we can access it from Inspector.
We’ll create an array of this class to store multiple color mappings to objects (prefab, to be more precise) later.
That’s pretty much it.
Step 2 Painting Level
Now we’ll move to the colorful part. We will now be painting the level.
Yes! You read it right. We’ll just paint it.
This is the level I’ve painted in Photoshop. You can use any of your favorite image editor.
Just make sure you use brush size of 1 px so that you can work precisely.
My "painting" looks something like this.

Here’s how I did it:
- Take a new file in photoshop of size 32*8.
- Select pencil tool and set the brush size to 1 px and opacity to 100%.
- Start painting!
You can take any size of the image to paint your map as you like.
Now that we’ve painted the level, save it as a .png file. And import in Unity.
Step 3 Texture Setup
Create an empty GameObject in the hierarchy and give it the script we've created in the first step. Now assign the imported file in our level generator.
We’re almost finished now. Just remember to keep these settings in the image file.
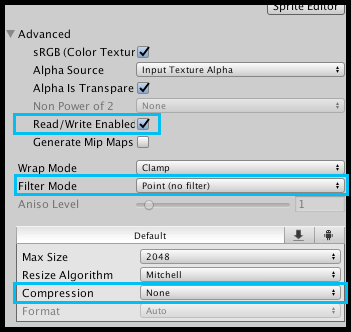
- Filter mode = point
- Compression = none
- Advanced → Read/Write Enabled = true
After setting this up the only thing left to do is assign colors and prefabs:
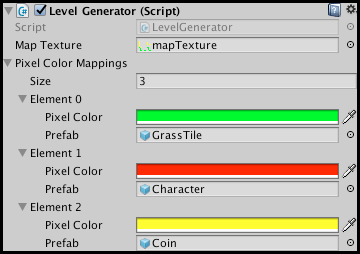
And we’re ready to go!
Hit play and see the magic.
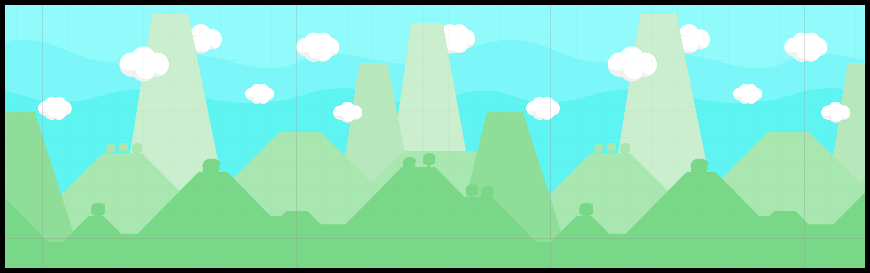
The result should look something like this.
Before level generation:
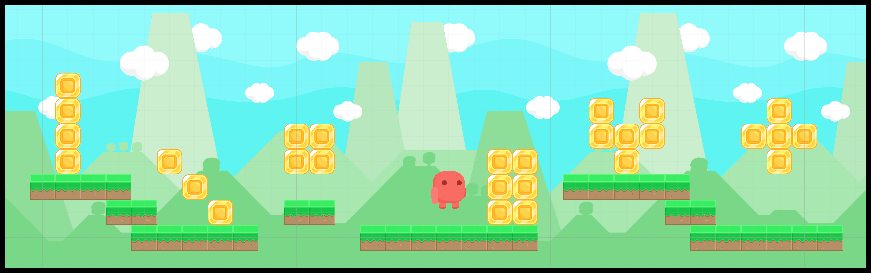
After level generation:
For this demo I’ve used "Free Platform Game Assets" from the Unity asset store.
You can find it here:
Note
If the objects are overlapping in your scene, try tweaking the "Pixel per Unit" value of that image.
This colorful topic ends here. I hope you also achieved a similar result.
If you need to ask something or share any ideas about this topic just drop a comment in the comment section. We’ll be there with you.
Feel free to contact us if you really liked this blog. And don’t forget to share your comments below!
TheAppGuruz is a leading Mobile Game development company in India. We are proficient in Unity and we have design & developed 500+ Android and iOS mobile games for various client across the globe. If you have any game project that need professional help feel free to contact us.
We provide mobile game development services in countries like US, UK, Australia, UAE, Kuwait, Qatar, India, China, Indonesia, Singapore and European countries
Tune in to our social media for the latest on Facebook | Twitter | Linkedin | YouTube.

An Addictive Gamer turned into a Professional Game Developer. I work with Unity Engine. Part of TheAppGuruz Team. Ready to take on Challenging Games & increase my knowledge about Game Development.