
Be patient..... we are fetching your source code.
Objective
The Main objective of this blog post is how to make a simple table view & understanding about UITableView Delegate and DataSource in Swift programming language in iOS.
This blog gives idea about how to deal with UITableView and its delegate and datasource methods in swift programming language in iOS. Swift is newly introduced programming language for iOS development.
For more information you can refer to our earlier blog named:
Step 1 Create a new project
Open Xcode 6 and Create new project as Single view application, give appropriate name of project and save it in swift Programming language.
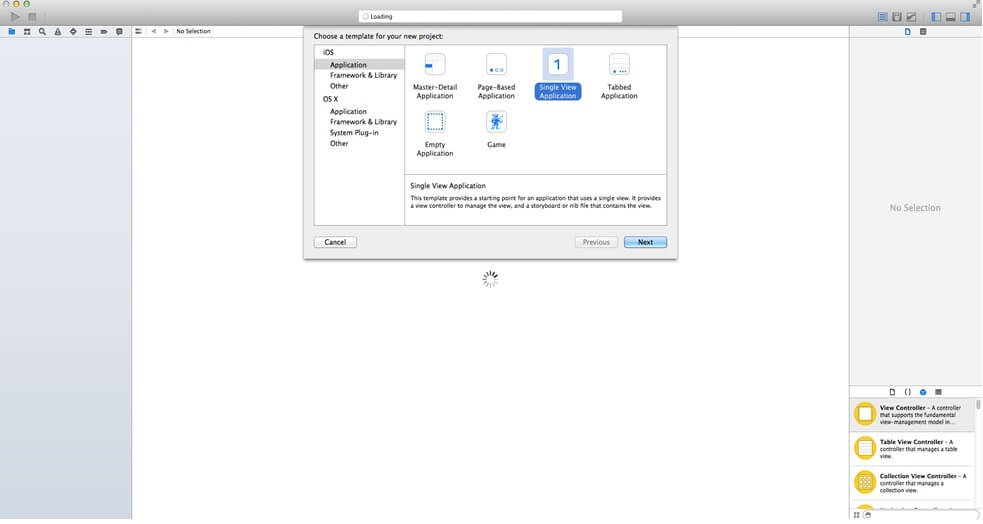
You can get more detail about creating XCode project from following link:
Step 2 Design UI
Create following user Interface to story board.
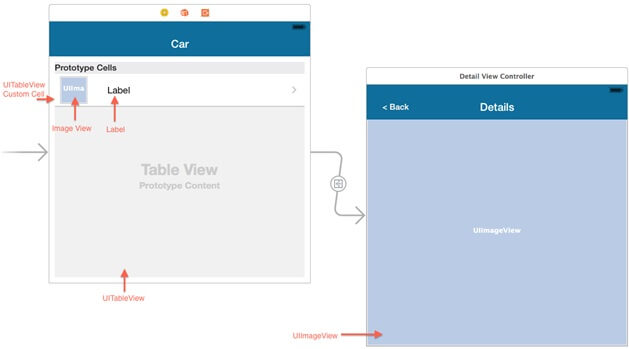
Step 3 Add a table view in your view controller
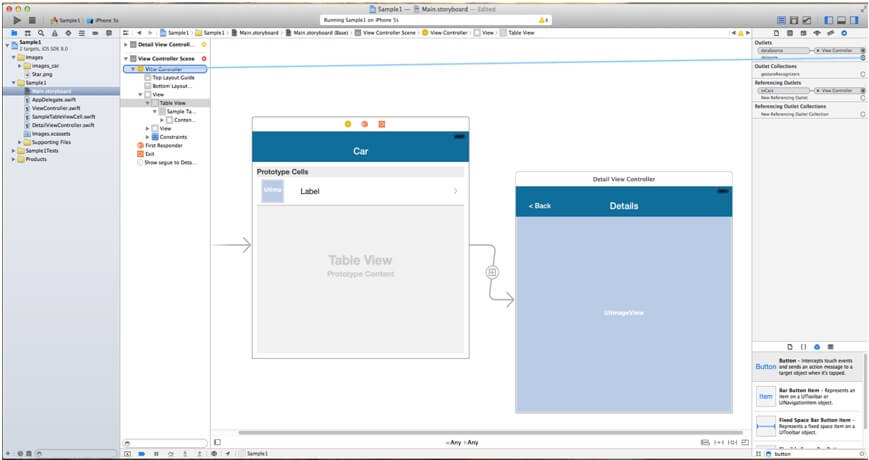
Now we have defined two view controllers in storyboard say main View Controller and DetailViewController. Now Select table view and set its delegate and data source to main View Controller which is describe in following figure.
Step 4 Implement delegate methods
Implement following delegate methods of UITableview in your ViewController.swift file.
funcnumberOfSectionsInTableView(tableView: UITableView) ->Int
{
return 1
}

functableView(tableView: UITableView, numberOfRowsInSection section: Int) ->Int
{
//make sure you use the relevant array sizes
returncar.count
}

functableView(tableView: UITableView, cellForRowAtIndexPathindexPath: NSIndexPath) ->UITableViewCell
{
var cell : SampleTableViewCell! = tableView.dequeueReusableCellWithIdentifier("Cell") as SampleTableViewCell
if(cell == nil)
{
cell = NSBundle.mainBundle().loadNibNamed("Cell", owner: self, options: nil)[0] as SampleTableViewCell;
}
ifUIScreen.mainScreen().bounds.size.height>768
       {
cell.ivWidthConstraint.constant = 100
       }
letstringTitle = carName[indexPath.row] as String //NOT NSString
letstrCarName = car[indexPath.row] as String
cell.lblTitle.text=stringTitle
cell.IvPhoto.image=UIImage(named: strCarName)
return cell as SampleTableViewCell
}
Step 5 Create segue
Create segue as per following figure and named it as DetailSegue.
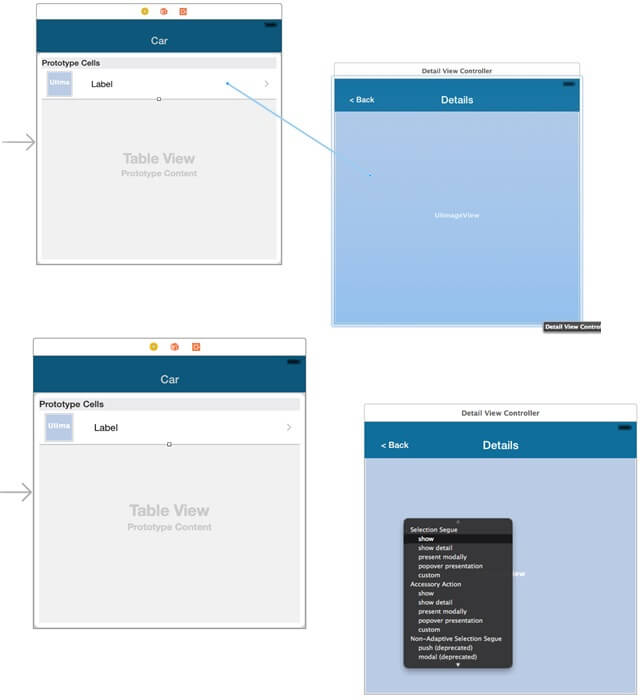
Step 6 prepareForSegue Method
Now when we select row of UITableView, we move to new page say our next DetailViewController for that we have to push segue and pass data using following method.
override func prepareForSegue(segue: UIStoryboardSegue, sender: AnyObject?)
    {
        if segue.identifier == "DetailSegue"
        {
            let detailViewController = ((segue.destinationViewController) as! DetailViewController)
            let indexPath = self.tvCars!.indexPathForSelectedRow!
            let strImageName = car[indexPath.row]
            detailViewController.strImageName = strImageName
            detailViewController.title = strImageName
        }
    }
Step 7 Set View Header name
Now write down following line of code to viewDidLoad() method of DetailViewController which set appropriate image to imageview as per selection on image.
overridefuncviewDidLoad()
{
super.viewDidLoad()
letstrImageName="\(index).jpg"
self.ivDisplayImage.image=UIImage(named : "\(index).jpg")
       // Do any additional setup after loading the view.
}
Output:
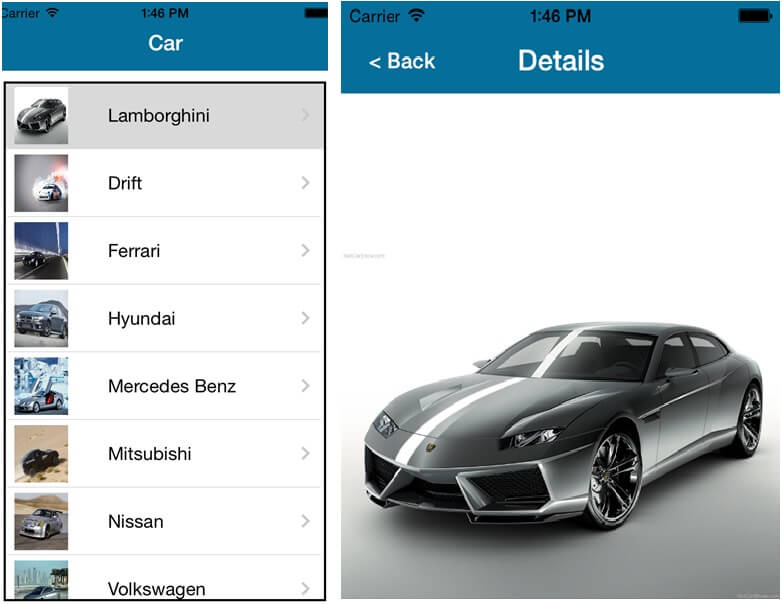
I hope you found this blog helpful while working on iOS Table View Tutorial using swift. Let me know if you have any questions or concerns regarding Swift App Development or iOS App Development, please put a comment here and we will get back to you ASAP.
Got an Idea of iPhone App Development? What are you still waiting for? Contact us now and see the Idea live soon. Our company has been named as one of the best iPhone App Development Company in India.

I am iOS developer, as a developer my basic goal is continue to learn and improve my development skills , to make application more user friendly.
Most Important iOS 8 Features
