To download the code, login with one of the following social providers.
Login
Be patient..... we are fetching your source code.

Objective
The main objective of this blog post is to give the brief introduction about Realm Database Structure for offline data storage.
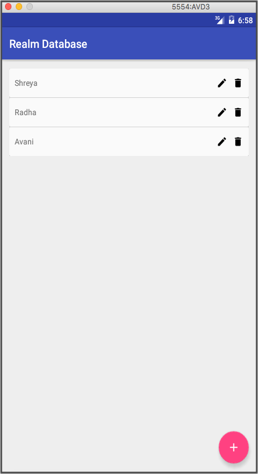
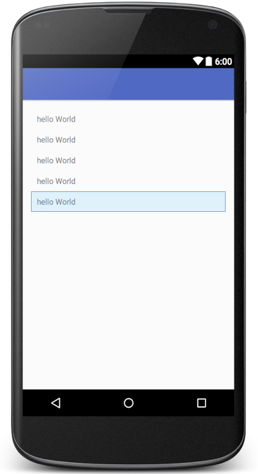
You will get Final Output:
Screenshots:
Hey guys, I think you all would be pretty familiar with SQLite database structure, what it is & how it is used. If you are not much aware of SQLite then I would suggest you to refer our fantastic blog post on SQLite in Android.
Do you find it difficult to maintain tables, writing queries and doing the database operations? If your answer is yes, then Realm is the best solution for you.
Step 1 Introduction
Realm is a lightweight database in Android, but it doesn't use SQLite. If we use ORMLite or ActiveAndroid or any other similar library, our data is stored in SQLite database, because these libraries give us only an overlay on SQLite.
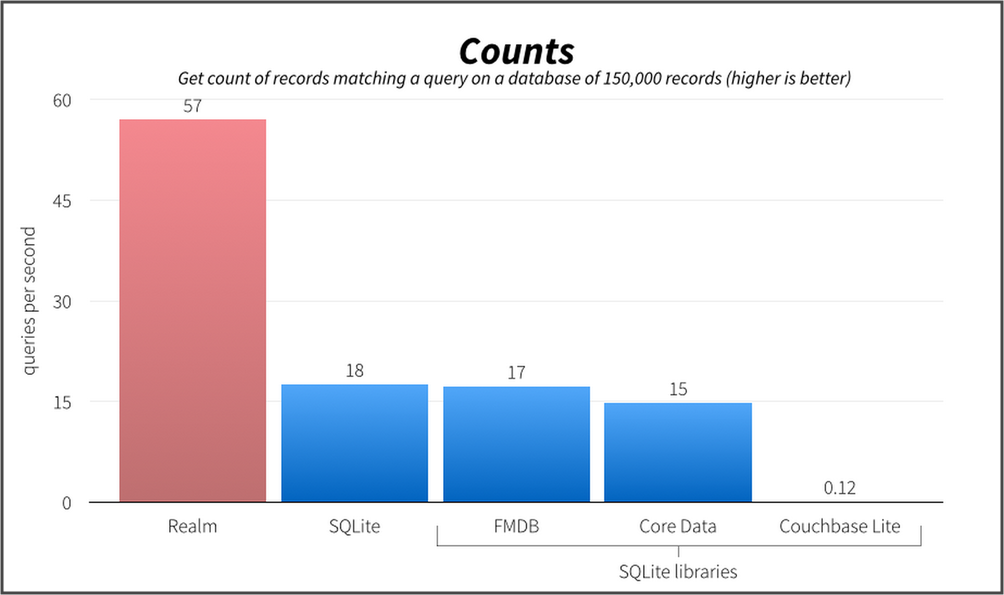
Realm occupies very less memory space compared to SQLite. So ultimately it reduces the overall size of our application. Realm is very fast in reading & writing data compared to SQLite.
Realm also allows us to write data in UI thread.
Note
Writing on UI thread is not the best practice though IMO. You can check out the following link in order to understand the topic in detail.
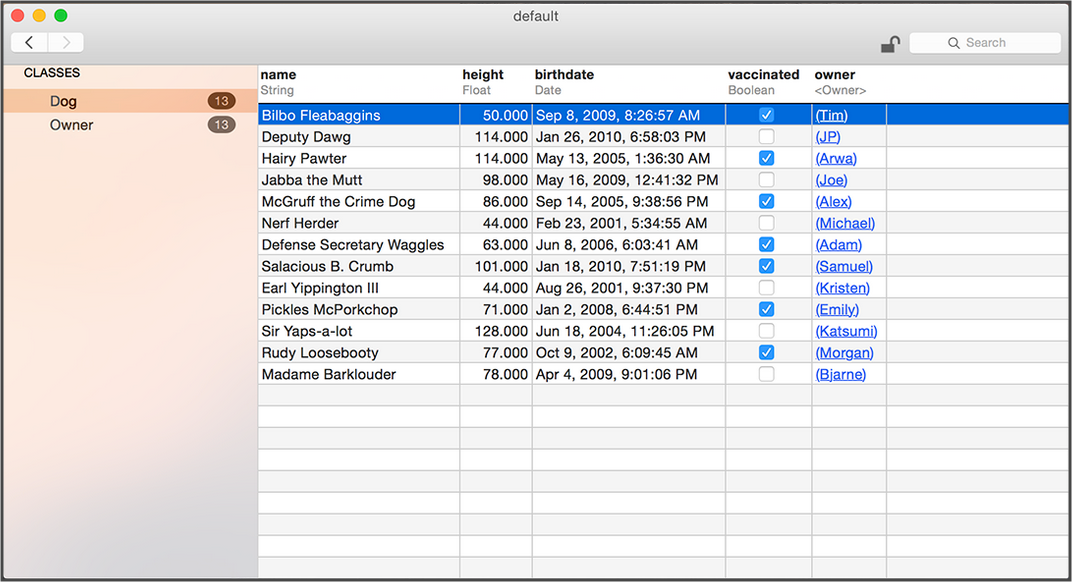
Realm is Cross Platform. It means you can share same data models over Android & iOS. Realm also has the utility called Realm Browser to easily explore your databases. And guess what, You can even edit them
Note
Realm Browser is available only for MacOS and not for Windows as of now.
Realm is not based on row-column structure, but it's based on Object tree.

Realm has JSON support. It means you can directly insert data in database from JSON without creating model class. Realm has fluent API, data change notifications & encryption support as well.
I think after reading above explanation, you would be totally excited to learn How to use Realm in Android programming.
So, let's begin our awesome journey with Realm.
Step 2 Create Project in Android Studio
Create a simple project in Android Studio with blank activity. If you don’t know how to create new project in Android Studio, Please check the following link:
Step 3 Add Realm IO Dependency
You need to add dependency in build.gradle (Module:app) file in order to use Realm Database. To do that, go to build.gradle file
compile 'io.realm:realm-android:0.86.0'
Copy the above line and paste it into the dependencies.
Note
Here, I am using realm-android:0.86.0
Your dependencies should look like following:
dependencies {
	               compile fileTree(dir: 'libs', include: ['*.jar'])
                   testCompile 'junit:junit:4.12'
	               compile 'com.android.support:appcompat-v7:23.1.1'
	               compile 'com.android.support:design:23.1.1'
	               compile 'io.realm:realm-android:0.86.0'
	               compile 'com.android.support:cardview-v7:
}
Now, sync your project. It will add dependency related to Realm in your project & then you will be able to use Realm database environment.
You can learn more about adding dependency to your Android Studio project from our other blog post:
Step 4 Create Model Class for Realm Database
To create model class ,click on file >> new >> Java Class. Give appropriate name to this java file. I named it as PersonDetailsModel.java. Model class must extend RealmObject class to use behaviour of Realm Database
PersonDetailsModel.java
public class PersonDetailsModel extends RealmObject
{
	@PrimaryKey
	private int id;
	private String name;
	private String email;
	private String address;
	private int age;
	public int getId() {
    	return id;
	}
	public void setId(int id) {
    	this.id = id;
	}
	public String getName() {
    	return name;
	}
	public void setName(String name) {
    	this.name = name;
	}
	public String getEmail() {
    	return email;
	}
	public void setEmail(String email) {
    	this.email = email;
	}
	public String getAddress() {
    	return address;
	}
	public void setAddress(String address) {
    	this.address = address;
	}
	public int getAge() {
    	return age;
	}
	public void setAge(int age) {
    	this.age = age;
	}
}
Model class should contain as many parameters as you want as columns in table.
Here, I have declared 5 parameters in my model class. Which means my table has 5 columns namely:
- id
- name
- address
- age
Realm supports boolean, byte, short, int, long, float, double, string, date, byte[] data types. The boxed types Boolean, Byte, Short, Integer, Long, Float, Double can also be used in model class. Using these types, it is possible to set the value of a field to null.
Here, I used annotation @PrimaryKey to declare id as a primary key
@PrimaryKey
private int id;
Realm supports annotations like...
| @Required | Enforces checks to disallow null values |
| @Ignore | Field should not be persisted to disk |
| @Index | Add a search index to the field |
| @PrimaryKey | Uniquely identifies each record in the database |
Note
@PrimaryKey provides constraint for unique value. But it doesn't provide auto-increment value for specific field. We have to manage that field manually.
After declaring the fields, I have created the getter and setter method for each field as per getter-setter rules. As we have extended RealmObject class, we can't override toString() method which is disadvantageous.
Step 5 Create Activity which Display Names
I want to display a list of name of persons in ListView, for that, I need to create a layout which contains ListView widget. So let’s get started with creating a layout.
5.1 Update content_main.xml file with the following code
To create layout file, right click on and select resource file. Give appropriate name to that layout file. In my example, is used to display list of names of persons.
content_main.xml
<?xml version="1.0" encoding="utf-8"?>
<LinearLayout xmlns:android="http://schemas.android.com/apk/res/android"
    xmlns:app="http://schemas.android.com/apk/res-auto"
    xmlns:tools="http://schemas.android.com/tools"
    android:layout_width="match_parent"
    android:layout_height="match_parent"
    android:orientation="vertical"
    android:paddingBottom="@dimen/activity_vertical_margin"
    android:paddingLeft="@dimen/activity_horizontal_margin"
    android:paddingRight="@dimen/activity_horizontal_margin"
    android:paddingTop="@dimen/activity_vertical_margin"
    app:layout_behavior="@string/appbar_scrolling_view_behavior"
    tools:context=".Activities.MainActivity"
    tools:showIn="@layout/activity_main">

    <ListView
        android:id="@+id/lvPersonNameList"
        android:layout_width="match_parent"
        android:layout_height="wrap_content" />
</LinearLayout>

In this layout file, I have used ListView (You can change the properties of a ListView as per your application requirements) to display list of names.
Now to add names in ListView at runtime, I have to create one layout which inflates to ListView at runtime
So, I am going to create file
5.2 Create inflate_list_item.xml layout file
inflate_list_item.xml
<?xml version="1.0" encoding="utf-8"?>
<LinearLayout xmlns:android="http://schemas.android.com/apk/res/android"
    xmlns:tools="http://schemas.android.com/tools"
    android:layout_width="match_parent"
    android:layout_height="match_parent"
    android:orientation="vertical">
    <android.support.v7.widget.CardView
        android:layout_width="match_parent"
        android:layout_height="50dp">
        <LinearLayout
            android:layout_width="match_parent"
            android:layout_height="match_parent">
            <TextView
                android:id="@+id/tvPersonName"
                android:layout_width="0dp"
                android:layout_height="wrap_content"
                android:layout_gravity="center_vertical"
                android:layout_weight="0.9"
                android:padding="10dp"
                tools:text="hello world" />
            <ImageView
                android:id="@+id/ivEditPesonDetail"
                android:layout_width="20dp"
                android:layout_height="20dp"
                android:layout_gravity="center_vertical"
                android:layout_marginEnd="@dimen/margin_10dp"
                android:layout_marginRight="@dimen/margin_10dp"
                android:src="@drawable/edit_icon" />
            <ImageView
                android:id="@+id/ivDeletePerson"
                android:layout_width="20dp"
                android:layout_height="20dp"
                android:layout_gravity="center_vertical"
                android:layout_marginEnd="@dimen/margin_10dp"
                android:layout_marginRight="@dimen/margin_10dp"
                android:src="@drawable/delete_icon" />
        </LinearLayout>
    </android.support.v7.widget.CardView>
</LinearLayout>
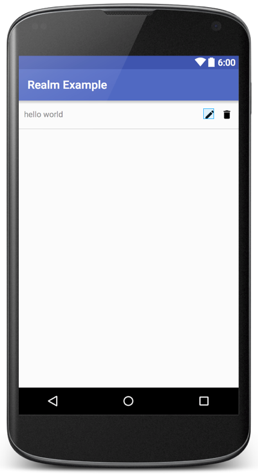
This layout file contains one textview for displaying names & two ImageViews for Update/ Delete operation.
| One TextView | To Display Person's Name |
| Two ImageViews | Update Operation Delete Operation |
I will inflate this layout file to ListView, that I have declared in content_main.xml layout file.
Layout part is done, so now let’s move towards the coding part of the first activity.
5.3 Update MainActivity.java file with the following code
MainActivity.java
public class MainActivity extends AppCompatActivity implements View.OnClickListener {

   private static int id = 1;
   private FloatingActionButton fabAddPerson;
   private Realm myRealm;
   private ListView lvPersonNameList;
   private static ArrayList<PersonDetailsModel> personDetailsModelArrayList = new ArrayList<>();
   private PersonDetailsAdapter personDetailsAdapter;
   private static MainActivity instance;
   private AlertDialog.Builder subDialog;

   @Override
   protected void onCreate(Bundle savedInstanceState) {
       super.onCreate(savedInstanceState);
       setContentView(R.layout.activity_main);
       Toolbar toolbar = (Toolbar) findViewById(R.id.toolbar);
       setSupportActionBar(toolbar);

       myRealm = Realm.getInstance(MainActivity.this);
       instance = this;

       getAllWidgets();
       bindWidgetsWithEvents();
       setPersonDetailsAdapter();
       getAllUsers();
   }

   public static MainActivity getInstance() {
       return instance;
   }

   private void getAllWidgets() {
       fabAddPerson = (FloatingActionButton) findViewById(R.id.fabAddPerson);
       lvPersonNameList = (ListView) findViewById(R.id.lvPersonNameList);
   }

   private void bindWidgetsWithEvents() {
       fabAddPerson.setOnClickListener(this);
       lvPersonNameList.setOnItemClickListener(new AdapterView.OnItemClickListener() {
           @Override
           public void onItemClick(AdapterView<?> parent, View view, int position, long id) {
               Intent intent=new Intent(MainActivity.this,PersonDetailsActivity.class);
               intent.putExtra("PersonID", personDetailsModelArrayList.get(position).getId());
               startActivity(intent);
           }
       });
   }

   private void setPersonDetailsAdapter() {
       personDetailsAdapter = new PersonDetailsAdapter(MainActivity.this, personDetailsModelArrayList);
       lvPersonNameList.setAdapter(personDetailsAdapter);
   }

   @Override
   public void onClick(View v) {
       switch (v.getId()) {
           case R.id.fabAddPerson:
               addOrUpdatePersonDetailsDialog(null,-1);
               break;
       }
   }

   public void addOrUpdatePersonDetailsDialog(final PersonDetailsModel model,final int position) {

       //subdialog
       subDialog =  new AlertDialog.Builder(MainActivity.this)
               .setMessage("Please enter all the details!!!")
               .setCancelable(false)
               .setPositiveButton("Ok", new DialogInterface.OnClickListener() {
                   @Override
                   public void onClick(DialogInterface dlg2, int which) {
                       dlg2.cancel();
                   }
               });

       //maindialog
       LayoutInflater li = LayoutInflater.from(MainActivity.this);
       View promptsView = li.inflate(R.layout.prompt_dialog, null);
       AlertDialog.Builder mainDialog = new AlertDialog.Builder(MainActivity.this);
       mainDialog.setView(promptsView);

       final EditText etAddPersonName = (EditText) promptsView.findViewById(R.id.etAddPersonName);
       final EditText etAddPersonEmail = (EditText) promptsView.findViewById(R.id.etAddPersonEmail);
       final EditText etAddPersonAddress = (EditText) promptsView.findViewById(R.id.etAddPersonAddress);
       final EditText etAddPersonAge = (EditText) promptsView.findViewById(R.id.etAddPersonAge);

       if (model != null) {
           etAddPersonName.setText(model.getName());
           etAddPersonEmail.setText(model.getEmail());
           etAddPersonAddress.setText(model.getAddress());
           etAddPersonAge.setText(String.valueOf(model.getAge()));
       }

       mainDialog.setCancelable(false)
               .setPositiveButton("Ok", null)
               .setNegativeButton("Cancel", new DialogInterface.OnClickListener() {
                   @Override
                   public void onClick(DialogInterface dialog, int which) {
                       dialog.cancel();
                   }
               });

       final AlertDialog dialog = mainDialog.create();
       dialog.show();

       Button b = dialog.getButton(AlertDialog.BUTTON_POSITIVE);
       b.setOnClickListener(new View.OnClickListener() {
           @Override
           public void onClick(View view) {
               if (!Utility.isBlankField(etAddPersonName) && !Utility.isBlankField(etAddPersonEmail) && !Utility.isBlankField(etAddPersonAddress) && !Utility.isBlankField(etAddPersonAge)) {
                   PersonDetailsModel personDetailsModel = new PersonDetailsModel();
                   personDetailsModel.setName(etAddPersonName.getText().toString());
                   personDetailsModel.setEmail(etAddPersonEmail.getText().toString());
                   personDetailsModel.setAddress(etAddPersonAddress.getText().toString());
                   personDetailsModel.setAge(Integer.parseInt(etAddPersonAge.getText().toString()));

                   if (model == null)
                       addDataToRealm(personDetailsModel);
                   else
                       updatePersonDetails(personDetailsModel, position, model.getId());

                   dialog.cancel();
               } else {
                   subDialog.show();
               }
           }
       });
   }

   private void addDataToRealm(PersonDetailsModel model) {
       myRealm.beginTransaction();

       PersonDetailsModel personDetailsModel = myRealm.createObject(PersonDetailsModel.class);
       personDetailsModel.setId(id);
       personDetailsModel.setName(model.getName());
       personDetailsModel.setEmail(model.getEmail());
       personDetailsModel.setAddress(model.getAddress());
       personDetailsModel.setAge(model.getAge());
       personDetailsModelArrayList.add(personDetailsModel);

       myRealm.commitTransaction();
       personDetailsAdapter.notifyDataSetChanged();
       id++;
   }

   public void deletePerson(int personId, int position) {
       RealmResults<PersonDetailsModel> results = myRealm.where(PersonDetailsModel.class).equalTo("id", personId).findAll();

       myRealm.beginTransaction();
       results.remove(0);
       myRealm.commitTransaction();

       personDetailsModelArrayList.remove(position);
       personDetailsAdapter.notifyDataSetChanged();
   }

   public PersonDetailsModel searchPerson(int personId) {
       RealmResults<PersonDetailsModel> results = myRealm.where(PersonDetailsModel.class).equalTo("id", personId).findAll();

       myRealm.beginTransaction();
       myRealm.commitTransaction();

       return results.get(0);
   }

   public void updatePersonDetails(PersonDetailsModel model,int position,int personID) {
       PersonDetailsModel editPersonDetails = myRealm.where(PersonDetailsModel.class).equalTo("id", personID).findFirst();
       myRealm.beginTransaction();
       editPersonDetails.setName(model.getName());
       editPersonDetails.setEmail(model.getEmail());
       editPersonDetails.setAddress(model.getAddress());
       editPersonDetails.setAge(model.getAge());
       myRealm.commitTransaction();

       personDetailsModelArrayList.set(position, editPersonDetails);
       personDetailsAdapter.notifyDataSetChanged();
   }

   private void getAllUsers() {
       RealmResults<PersonDetailsModel> results = myRealm.where(PersonDetailsModel.class).findAll();

       myRealm.beginTransaction();

       for (int i = 0; i < results.size(); i++) {
           personDetailsModelArrayList.add(results.get(i));
       }

       if(results.size()>0)
           id = myRealm.where(PersonDetailsModel.class).max("id").intValue() + 1;
       myRealm.commitTransaction();
       personDetailsAdapter.notifyDataSetChanged();
   }

   @Override
   protected void onDestroy() {
       super.onDestroy();
       personDetailsModelArrayList.clear();
       myRealm.close();
   }
}
Let's understand what code does actually. First and foremost task is to get a reference of all required widgets in your activity. Here, I have defined getAllWidgets() method to do this task
private void getAllWidgets() {
fabAddPerson = (FloatingActionButton) findViewById(R.id.fabAddPerson);
lvPersonNameList = (ListView)findViewById(R.id.lvPersonNameList);
}
I am using ListView for displaying list of names & FloatingActionButton to add or insert new record in Realm Database. After that, bind the widget with its action listeners. Here, I have defined bindWidgetsWithEvents() method to do this task.
private void bindWidgetsWithEvents() {
   fabAddPerson.setOnClickListener(this);
   lvPersonNameList.setOnItemClickListener(new AdapterView.OnItemClickListener() {
       @Override
       public void onItemClick(AdapterView<?> parent, View view, int position, long id) {
Intent intent=new Intent(MainActivity.this,PersonDetailsActivity.class);
intent.putExtra("PersonID", personDetailsModelArrayList.get(position).getId());
startActivity(intent);
       }
   });
}
onClick() of FloatingActionButton will open dialog box, which allows user to fill required data
@Override
public void onClick(View v) {
    switch (v.getId()) {
        case R.id.fabAddPerson:
            addOrUpdatePersonDetailsDialog(null,-1);
            break;
    }
}
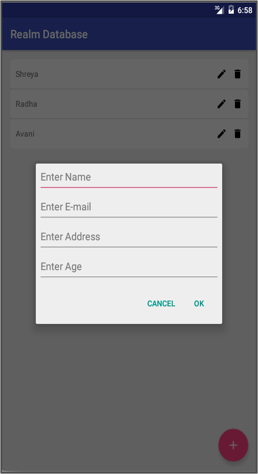
Here, onClick() of FloatingActionButton we are calling addOrUpdatePersonDetailsDialog() method. This method prompts the custom alert dialog box on FloatingActionButton's click.
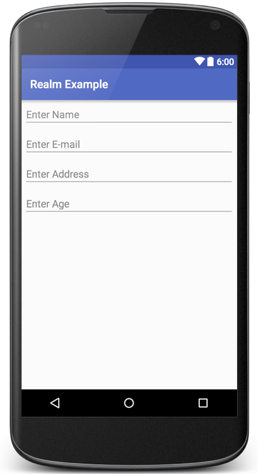
Custom layout for alert dialog is given below, which contains 4 EditTexts to take input for:
- Name
- Address
- Age
prompt_dialog.java
<?xml version="1.0" encoding="utf-8"?>
<LinearLayout xmlns:android="http://schemas.android.com/apk/res/android"
    android:layout_width="match_parent"
    android:layout_height="match_parent"
    android:orientation="vertical">
    <EditText
        android:id="@+id/etAddPersonName"
        android:layout_width="match_parent"
        android:layout_height="wrap_content"
        android:layout_margin="@dimen/margin_5dp"
        android:hint="@string/person_name_hint" />
    <EditText
        android:id="@+id/etAddPersonEmail"
        android:layout_width="match_parent"
        android:layout_height="wrap_content"
        android:layout_margin="@dimen/margin_5dp"
        android:hint="@string/person_email_hint" />
    <EditText
        android:id="@+id/etAddPersonAddress"
        android:layout_width="match_parent"
        android:layout_height="wrap_content"
        android:layout_margin="@dimen/margin_5dp"
        android:hint="@string/perosn_address_hint" />
    <EditText
        android:id="@+id/etAddPersonAge"
        android:layout_width="match_parent"
        android:layout_height="wrap_content"
        android:layout_margin="@dimen/margin_5dp"
        android:hint="@string/person_age_hint"
        android:inputType="number" />
</LinearLayout>
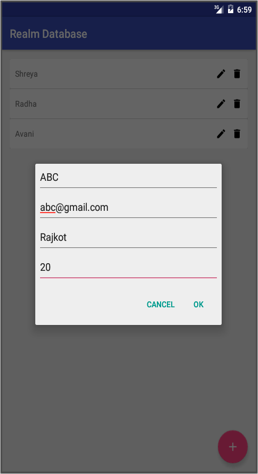
After filling all the details ,when user presses ok, entered data will be validated & alert will be generated if validation fails else data will be inserted into realm database successfully.
For validation of fields following method will be invoked:
public class Utility
{
    public static boolean isBlankField(EditText etPersonData)
    {
        return etPersonData.getText().toString().trim().equals("");
    }
}
How realm object is created & how to perform insert operation on it is the main topic to be focused. Let's see it. So, to do that, first of all, create an instance of realm class. I have created it in onCreate() method
@Override
protected void onCreate(Bundle savedInstanceState) {
...
	myRealm = Realm.getInstance(MainActivity.this);
...
}
There is one more way to instantiate realm object:
Realm myOtherRealm =Realm.getInstance(new RealmConfiguration.Builder(context.name("myOtherRealm.realm").build);
Using this way, you can give name to realm database. After initializing it once, you can perform any operation on it. So, let's insert data into database
5.3.1 Insert Data into Realm Database
private void addDataToRealm(PersonDetailsModel model) {
   myRealm.beginTransaction();

   PersonDetailsModel personDetailsModel = myRealm.createObject(PersonDetailsModel.class);
   personDetailsModel.setId(id);
   personDetailsModel.setName(model.getName());
   personDetailsModel.setEmail(model.getEmail());
   personDetailsModel.setAddress(model.getAddress());
   personDetailsModel.setAge(model.getAge());
   personDetailsModelArrayList.add(personDetailsModel);

   myRealm.commitTransaction();
   personDetailsAdapter.notifyDataSetChanged();
   id++;
}
To perform any transaction on realm you must call beginTransaction() method to begin and commitTransaction() method to commit the transaction. All the operations on the database must be placed between these two statements.
If you don't want to call these methods, an alternative is available for it.
- Alternative : You can call executeTransaction() method of realm class and perform operation in this method
myRealm.executeTransaction(new Realm.Transaction() {
   @Override
    public void execute(Realm realm) {
          PersonDetailsModel personDetailsModel = myRealm.createObject(PersonDetailsModel.class);
    		personDetailsModel.setId(id);
   		personDetailsModel.setName(model.getName());
    		persondetailsModel.setEmail(model.getEmail());
    		persondetailsModel.setAddress(model.getAddress());
   		persondetailsModel.setAge(model.getAge());
    		persondetailsModelArrayList.add(persondetailsModel);
    		myRealm.commitTransaction();
    		personDetailsAdapter.notifyDataSetChanged();
   		id++;
    }
});
This method automatically handles begin/ commit transaction methods.
Another amazing thing is that Realm supports Asynchronous Transactions. In the previous executeTransaction() method just add a Realm.Transaction.Callback() parameter to make the process asynchronous.
@Override
   public void execute(Realm realm) {
          PersonDetailsModel persondetailsModel = myRealm.createObject(PersonDetailsModel.class);
    		persondetailsModel.setId(id);
   		persondetailsModel.setName(model.getName());
    		persondetailsModel.setEmail(model.getEmail());
    		persondetailsModel.setAddress(model.getAddress());
   		persondetailsModel.setAge(model.getAge());
    		persondetailsModelArrayList.add(persondetailsModel);
    		myRealm.commitTransaction();
    		personDetailsAdapter.notifyDataSetChanged();
   		id++;
    }
		}, new Realm.Transaction.Callback() {
    @Override
    public void onSuccess() {
        //Person Details saved
    }
    @Override
    public void onError(Exception e) {
        //Transaction is rolled-back
    }
});
myRealm.createObject() will create the instance of realm, to manage an instance of RealmObject. After that using setter method of model class, I have inserted value in each field.
Here, field ID is managed manually as Realm doesn't support auto_increment. myRealm.commitTransaction() will commit transaction & insert record into realm.
5.3.2 Update Data into Realm Database
"Yeah, good news...?? What?? You learnt how to insert record in database & hopefully inserted too."
"Obviously, it's so easy compared to SQLite. So now what?? Insert 3-5 records in your database, so we can easily perform update & delete operation on it."
"Now guys, you can see update image on right side of each item it's for updating record."
When you click on it, custom alert dialog with specific user details will appear on device. For that, you have to write Adapter code. Let's see it.
PersonDetailsAdapter.java
public class PersonDetailsAdapter extends BaseAdapter {
    private ArrayList<PersonDetailsModel> personDetailsArrayList;
    private Context context;
    private LayoutInflater inflater;
    public PersonDetailsAdapter(Context context, ArrayList<PersonDetailsModel> personDetailsArrayList) {
        this.context = context;
        this.personDetailsArrayList = personDetailsArrayList;
        inflater = (LayoutInflater) context.getSystemService(Context.LAYOUT_INFLATER_SERVICE);
    }
    @Override
    public int getCount() {
        return personDetailsArrayList.size();
    }
    @Override
    public Object getItem(int position) {
        return personDetailsArrayList.get(position);
    }
    @Override
    public long getItemId(int position) {
        return 0;
    }
    @Override
    public View getView(final int position, View convertView, ViewGroup parent) {
        View v = convertView;
        Holder holder;
        if (v == null) {
            v = inflater.inflate(R.layout.inflate_list_item, null);
            holder = new Holder();
            holder.tvPersonName = (TextView) v.findViewById(R.id.tvPersonName);
            holder.ivEditPesonDetail=(ImageView)v.findViewById(R.id.ivEditPesonDetail);
            holder.ivDeletePerson=(ImageView)v.findViewById(R.id.ivDeletePerson);
            v.setTag(holder);
        } else {
            holder = (Holder) v.getTag();
        }
        holder.tvPersonName.setText(personDetailsArrayList.get(position).getName());
        holder.ivEditPesonDetail.setOnClickListener(new View.OnClickListener() {
            @Override
            public void onClick(View v) {
 PersonDetailsModel dataToEditModel= MainActivity.getInstance().searchPerson(personDetailsArrayList.get(position).getId());
MainActivity.getInstance().addOrUpdatePersonDetailsDialog(dataToEditModel,position);

            }
        });
        holder.ivDeletePerson.setOnClickListener(new View.OnClickListener() {
            @Override
            public void onClick(View v) {
                ShowConfirmDialog(context,personDetailsArrayList.get(position).getId(), position);
            }
        });
        return v;
    }
    class Holder {
        TextView tvPersonName;
        ImageView ivDeletePerson, ivEditPesonDetail;
    }
public static void ShowConfirmDialog(Context context,final int personId,final int position)
    {
        AlertDialog.Builder alertDialogBuilder = new AlertDialog.Builder(context);
        alertDialogBuilder
                .setMessage("Are you sure you want to delete this record?")
                .setCancelable(true)
                .setPositiveButton("Yes", new DialogInterface.OnClickListener() {
                    public void onClick(DialogInterface dialog,int id) {
                        MainActivity.getInstance().deletePerson(personId,position);
                    }
                })
                .setNegativeButton("No", new DialogInterface.OnClickListener() {
                    public void onClick(DialogInterface dialog,int id) {
                        dialog.cancel();
                    }
                });
        AlertDialog alertDialog = alertDialogBuilder.create();
        alertDialog.show();
    }
}
Here, onClick() of edit ImageView will call searchPerson() method to search details for specific ID associated with person details in Realm Database
public PersonDetailsModel searchPerson(int personId) {
   RealmResults<PersonDetailsModel> results = myRealm.where(PersonDetailsModel.class).equalTo("id", personId).findAll();

   myRealm.beginTransaction();
   myRealm.commitTransaction();

   return results.get(0);
}
Here, myRealm.where(PersonDetailsModel.class).equalTo("id", personId).findAll() will work same as SELECT * FROM PERSON WHERE ID=personId
"Ohh, don't you think so it's so simple without any hazard of remembering query structure & all."
Yeah, now 'results’ variable will store all the records returned as a result of query. Now, call to addOrUpdatePersonDetailsDialog() method will provide the same dialog as insert data but with specific user details for specific ID. After that validation will be checked for filled details.
After successful validation, details will be updated in database by calling updatePersonDetails() method.
public void updatePersonDetails(PersonDetailsModel model,int position,int personID) {
   PersonDetailsModel editPersonDetails = myRealm.where(PersonDetailsModel.class).equalTo("id", personID).findFirst();
   myRealm.beginTransaction();
   editPersonDetails.setName(model.getName());
   editPersonDetails.setEmail(model.getEmail());
   editPersonDetails.setAddress(model.getAddress());
   editPersonDetails.setAge(model.getAge());
   myRealm.commitTransaction();

   personDetailsModelArrayList.set(position, editPersonDetails);
   personDetailsAdapter.notifyDataSetChanged();
}
It will update the record for specific ID in database.
5.3.3 Delete Data from Realm Database
"Again happy hours guys, you learnt how to update the record"
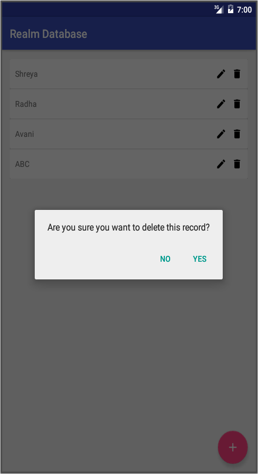
Let's delete some records. But how? onClick() of delete ImageView for specific person will open confirm dialog.
Then record will be deleted by the following code:
public void deletePerson(int personId, int position) {
   RealmResults<PersonDetailsModel> results = myRealm.where(PersonDetailsModel.class).equalTo("id", personId).findAll();

   myRealm.beginTransaction();
   results.remove(0);
   myRealm.commitTransaction();

   personDetailsModelArrayList.remove(position);
   personDetailsAdapter.notifyDataSetChanged();
}
Here, ‘results’ variable will store record associated with specific ID. results.remove(0) method will delete the record on the 0th index in ‘results’ variable.
"Is it deleted in O/P? Yes or no? Yes, Congratulations guys, you almost achieve your best alternative for rubbish SQLite."
Note
It is good practice to close Realm Object onDestroy() method of Activity.
@Override
protected void onDestroy() {
    super.onDestroy();
    personDetailsModelArrayList.clear();
    myRealm.close();
}
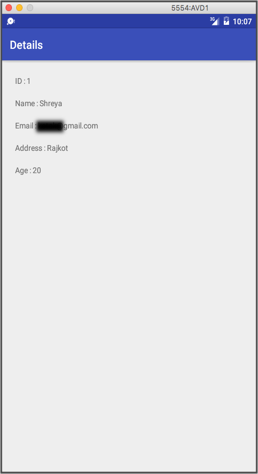
Step 6 Create Activity which displays details of Specific Person
6.1 Create activity_person_details.xml Layout file
Here, I have created layout which contains five textviews to display details:
- ID
- Name
- Address
- Age
activity_person_details.xml
<?xml version="1.0" encoding="utf-8"?>
<android.support.design.widget.CoordinatorLayout xmlns:android="http://schemas.android.com/apk/res/android"
    xmlns:app="http://schemas.android.com/apk/res-auto"
    xmlns:tools="http://schemas.android.com/tools"
    android:layout_width="match_parent"
    android:layout_height="match_parent"
    android:fitsSystemWindows="true"
    tools:context=".Activities.PersonDetailsActivity">

    <android.support.design.widget.AppBarLayout
        android:layout_width="match_parent"
        android:layout_height="wrap_content"
        android:theme="@style/AppTheme.AppBarOverlay">

        <android.support.v7.widget.Toolbar
            android:id="@+id/toolbar"
            android:layout_width="match_parent"
            android:layout_height="?attr/actionBarSize"
            android:background="?attr/colorPrimary"
            app:popupTheme="@style/AppTheme.PopupOverlay" />

    </android.support.design.widget.AppBarLayout>

    <LinearLayout
        android:layout_width="match_parent"
        android:layout_height="match_parent"
        android:orientation="vertical"
        android:paddingBottom="@dimen/activity_vertical_margin"
        android:paddingLeft="@dimen/activity_horizontal_margin"
        android:paddingRight="@dimen/activity_horizontal_margin"
        android:paddingTop="@dimen/activity_vertical_margin"
        app:layout_behavior="@string/appbar_scrolling_view_behavior">

        <TextView
            android:id="@+id/tvPersonDetailID"
            android:layout_width="match_parent"
            android:layout_height="wrap_content"
            android:padding="10dp"
            tools:text="hello World" />

        <TextView
            android:id="@+id/tvPersonDetailName"
            android:layout_width="match_parent"
            android:layout_height="wrap_content"
            android:padding="10dp"
            tools:text="hello World" />

        <TextView
            android:id="@+id/tvPersonDetailEmail"
            android:layout_width="match_parent"
            android:layout_height="wrap_content"
            android:padding="10dp"
            tools:text="hello World" />

        <TextView
            android:id="@+id/tvPersonDetailAddress"
            android:layout_width="match_parent"
            android:layout_height="wrap_content"
            android:padding="10dp"
            tools:text="hello World" />

        <TextView
            android:id="@+id/tvPersonDetailAge"
            android:layout_width="match_parent"
            android:layout_height="wrap_content"
            android:padding="10dp"
            tools:text="hello World" />
    </LinearLayout>

</android.support.design.widget.CoordinatorLayout>
6.2 Create PersonDetailsActivity.java file
PersonDetailsActivity.java
public class PersonDetailsActivity extends AppCompatActivity {
    private TextView tvPersonDetailId,tvPersonDetailName,tvPersonDetailEmail,tvPersonDetailAddress,tvPersonDetailAge;
    private PersonDetailsModel personDetailsModel=new PersonDetailsModel();

    @Override
    protected void onCreate(Bundle savedInstanceState) {
        super.onCreate(savedInstanceState);
        setContentView(R.layout.activity_person_details);
        Toolbar toolbar = (Toolbar) findViewById(R.id.toolbar);
        setSupportActionBar(toolbar);
        getAllWidgets();
        getDataFromPreviousActivity();
        setDataInWidgets();
    }
    private void getAllWidgets()
    {
        tvPersonDetailId= (TextView) findViewById(R.id.tvPersonDetailID);
        tvPersonDetailName= (TextView) findViewById(R.id.tvPersonDetailName);
        tvPersonDetailEmail= (TextView) findViewById(R.id.tvPersonDetailEmail);
        tvPersonDetailAddress= (TextView) findViewById(R.id.tvPersonDetailAddress);
        tvPersonDetailAge= (TextView) findViewById(R.id.tvPersonDetailAge);
    }
    private void getDataFromPreviousActivity()
    {
int personID = getIntent().getIntExtra("PersonID", -1);
personDetailsModel=MainActivity.getInstance().searchPerson(personID);

    }
    private void setDataInWidgets()
    {
        tvPersonDetailId.setText(getString(R.string.person_id,String.valueOf(personDetailsModel.getId())));
        tvPersonDetailName.setText(getString(R.string.person_name,personDetailsModel.getName()));
        tvPersonDetailEmail.setText(getString(R.string.person_email,personDetailsModel.getEmail()));
        tvPersonDetailAddress.setText(getString(R.string.person_address,personDetailsModel.getAddress()));
        tvPersonDetailAge.setText(getString(R.string.person_age, String.valueOf(personDetailsModel.getAge())));
    }
}
This activity is getting personID from previous activity in intent. This personID will be passed in searchPerson() method to search details associated with that Id. searchPerson() method will return model class, which contains detail about specific person. I have displayed that details in textview.
Here, I have used different strings resources instead of direct string values which are specified below in strings.xml file
strings.xml
<resources>
   <string name="app_name">Realm Example</string>
    <string name="action_settings">Settings</string>
    <string name="activity_name">Realm Database</string>
    <string name="title_activity_person_details">Details</string>
    <string name="person_name_hint">Enter Name</string>
    <string name="person_email_hint">Enter E-mail</string>
    <string name="perosn_address_hint">Enter Address</string>
    <string name="person_age_hint">Enter Age</string>
    <string name="person_id">ID : %1$s</string>
    <string name="person_name">Name : %1$s</string>
    <string name="person_email">Email : %1$s</string>
    <string name="person_address">Address : %1$s</string>
    <string name="person_age">Age : %1$s</string>
</resources>
I hope you find this blog post very helpful while with Realm Database in Android. Let me know in comment if you have any questions about Realm Database in Android. I will reply you ASAP.
Learning Android sounds fun, right? Why not check out our other Android Tutorials?
Got an Idea of Android App Development? What are you still waiting for? Contact Us now and see the Idea live soon. Our company has been named as one of the best Android Application Development Company in India.

I am a passionate Android Developer.I like to develop different android applications with new concepts and ideas.
My First 15 days at The App Guruz
testingtitle