Be patient..... we are fetching your source code.
Objective
The main objective of this post is to learn Twitter REST API implementation in Swift 2.
I would be implementing following features in my example for this blog post:
- Login into twitter directly through the application
- Tweet directly through the application
- Fetch list of home feed tweets
Introduction:
Twitter REST API gives you access to following aspects while integrating Twitter in your iOS App.
- Provide interface and programmatic access to read / write data to twitter
- Identify twitter applications and its user using OAuth / xAuth authentication
- Allows posting new tweet
- Read profile
- Read followers data
- Get all tweets
- Update profile etc
In this blog post, I will be using FHSTwitterEngine library to implement Twitter API.
Step 1 Create Twitter App
You can create your Twitter app from the following Link.
a) Go to following Link:
b) To create new twitter app click on “Create New App” button.

[figure 1]
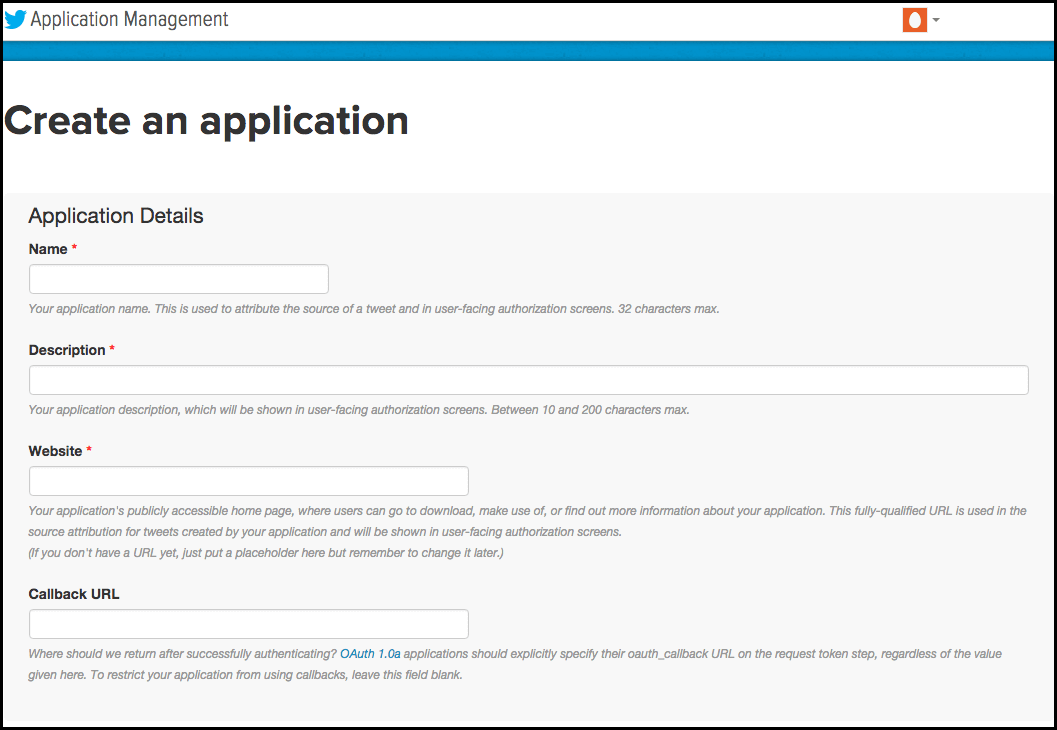
c) Fill the necessary details for your applications (Figure 2). Then Click on “Create your Twitter Application” button.
[figure 2]
d) Now select your app and you will get following details for the app:
- Details of application
- Get/update the settings
- Get/regenerate Keys and Access Tokens
- Get/update the Permissions

[figure 3]
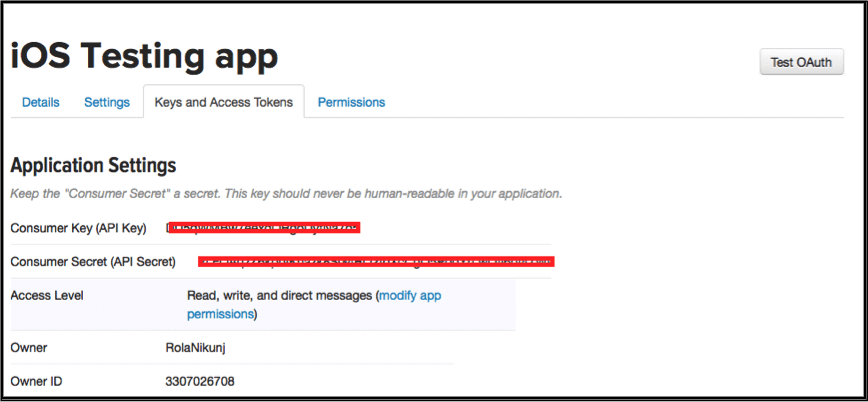
e) Go to “Keys and Access Tokens” tab, you will get your Consumer Key and Consumer secret.
This information will be use in our tutorial later on.
[figure 4]
Step 2 Integrate FHSTwitterEngine with your project
FHSTwitterEngine is a Twitter API, which allows you to do authentication and make REST API calls.
To do authorization, you can use either either OAuth or xAuth:
|
OAuth: It gives client applications a 'Secured delegate access' to server resources on behalf of a resource owner. You can get more idea about OAuth from following link: |
or
|
xAuth: It enables the device to authenticate xAuth users. They are users who authenticates when connecting to the security device using an AutoKey IKE VPN tunnel. You can get more idea about xAuth from following link: |
Following steps will gives you brief idea about how to implement FHSTwitterEngine in your application
a) Download FHSTwitterEngine third party library from the following link:
b) Copy FHSTwitterEngine folder from above downloaded file, which contains following four files:
- FHSTwitterEngine.h
- FHSTwitterEngine.m
- FHSStream.h
- FHSStream.m
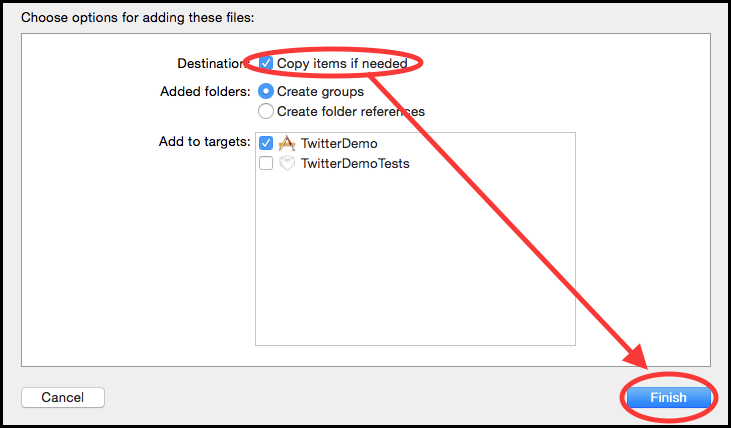
You will get a prompt as shown in the image below
[figure 5]
Check Copy items if needed and click on Finish.
c) Link your project against SystemConfigration.framework
Step 3 Design user Interface

[figure 6]
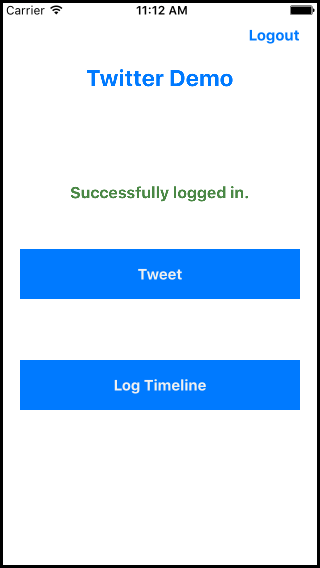
[figure 7]
You can get more idea about design user interface from following link:
Step 4 Setup Twitter Engine
Add Bridging Header (Objective-C to Swift Wrapper) FHSTwitterEngine is in Objective C so if you want to use it in your Swift 2 project you need a bridging header file in your project.
a. Go To File >> New >> file (select header file)
b. Use the [ProjectName]-Bridging-Header.h naming convention.
c. Go to Build Settings tab >> Swift Compiler section
- Install Objective-C Compatibility Header = Yes.
- Objective-C bridging Header = [name of bridging header file].

[figure 8]
#import FHSTwitterEngine.h to the created bridging header file.
You will get more idea about "How to integrate objective c file with swift" from metioned link:
Step 5 Set Consumer key for your application
You can get consumer key and secret of your app from the step 1 (e) Figure 4.
You can set consumer key twitter into viewDidLoad() of ViewController.swift file.
To set consumer key permanently:
FHSTwitterEngine.sharedEngine().permanentlySetConsumerKey("<CONSUMER_KEY> ", andSecret: "<CONSUMER_SECRET>")
To set consumer key temporarily:
FHSTwitterEngine.sharedEngine().temporarilySetConsumerKey (“<CONSUMER_KEY> ", andSecret: "<CONSUMER_SECRET>")
Step 6 Login through Twitter
You can login through Twitter in either of the following 2 methods:
a) OAuth:
let loginController = FHSTwitterEngine .sharedEngine() .loginControllerWithCompletionHandler { (Bool success) -> Void in

	//perform action when successfully logged in.

        self.btnLogin.hidden = true
        self.btnPostTweet.hidden = false
        self.btnMyProfile.hidden = false
        self.btnLogout.hidden = false
        self.lblSuccess.hidden = false

        } as UIViewController
        self .presentViewController(loginController, animated: true, completion: nil)
b) xAuth:
|
Challenge:
|
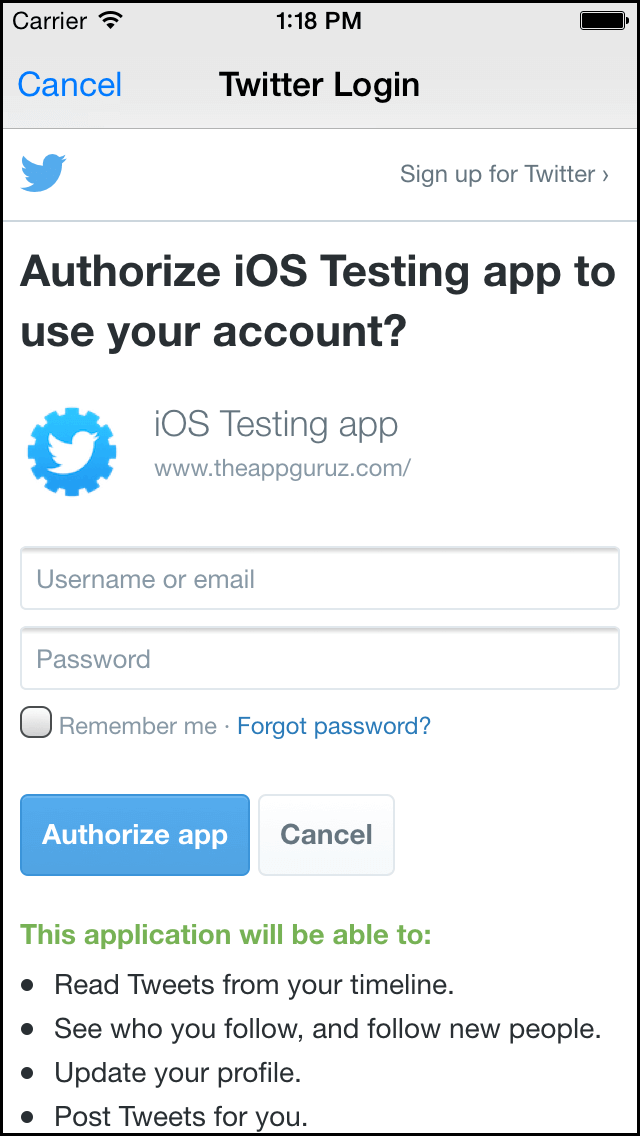
[figure 9]
In my demo application I am using login via OAuth when “Login Via Twitter” button is clicked.
Step 7 Get Twitter Data When user is successfully logged in
Get username:
FHSTwitterEngine.sharedEngine().authenticatedUsername
Get authenticated id of the logged in user:
FHSTwitterEngine.sharedEngine().authenticatedID
Step 8 Fetch Home Feed tweets
Get home feed using getHomeTimelineSinceID() method of FHSTwitterEngine:
let result = FHSTwitterEngine.sharedEngine().getHomeTimelineSinceID(FHSTwitterEngine.sharedEngine().authenticatedID, count: 10)
Step 9 Post Tweet
Tweet simple text using postTweet() method of FHSTwitterEngine:
FHSTwitterEngine.sharedEngine() .postTweet(<tweetString: String! String!>)
In my demo application when user clicks the “Tweet” button, I am posting a tweet with the custom message entered by user.
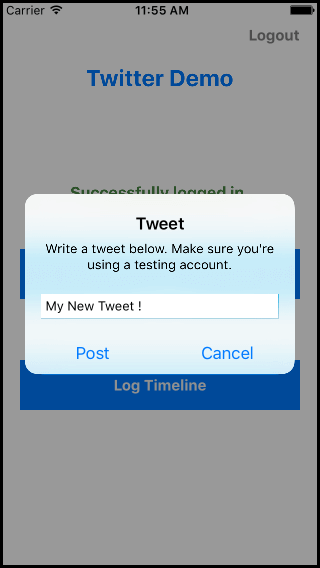
[figure 10]
@IBAction func btnPostTweetClicked(sender: AnyObject)
    {
        let alert = UIAlertController(title: "Tweet", message: "Write a tweet below. Make sure you're using a testing account.", preferredStyle: UIAlertControllerStyle.Alert)
        alert.addTextFieldWithConfigurationHandler({ (textField) -> Void in
            textField.placeholder = "Write a tweet here..." })
        alert.addAction(UIAlertAction(title: "Post", style: .Default, handler:
        { action in
            var title = String()
            var message = String()
            let textField = alert.textFields![0] as UITextField
            let result = FHSTwitterEngine.sharedEngine() .postTweet(textField.text!)

            if(result != nil)
            {
                title = "Error"
                message = "error occured while poting"
            }
            else
            {
                title = "Success"
                message = "Successfully posted."
            }
            let alertView = UIAlertController(title: title, message: message, preferredStyle: UIAlertControllerStyle.Alert)
            alertView.addAction(UIAlertAction(title: "Ok", style: .Default, handler:nil))
            self.presentViewController(alertView, animated: true, completion: nil)

        }))
        alert.addAction(UIAlertAction(title: "Cancel", style: .Default, handler:nil))
        self.presentViewController(alert, animated: true, completion: nil)
    }
Step 10 Other functions
a) To clear consumer key - When no longer required (generally at the time of logout)
FHSTwitterEngine.sharedEngine().clearConsumer()
b) To load access token - We might need to pass access token in some API calls
FHSTwitterEngine.sharedEngine().loadAccessToken()
c) To clear access token - When no longer needed
FHSTwitterEngine.sharedEngine().clearAccessToken()
d) Check if session is valid or not
FHSTwitterEngine.sharedEngine().isAuthorized()
I hope you will find this post very useful while working with Twitter REST API implementation using FHSTwitterEngine in Swift 2. Let me know in comment if you have any questions regarding in Swift. I will reply you ASAP.
Got an Idea of iPhone App Development? What are you still waiting for? Contact us now and see the Idea live soon. Our company has been named as one of the best iPhone App Development Company in India.

I am iOS developer, as a developer my basic goal is continue to learn and improve my development skills , to make application more user friendly.
