Be patient..... we are fetching your source code.
Objective
Main objective of this post is to give you an idea about how to make iOS App
Make an iPhone app:
This tutorial teaches you how to make iPhone app. You will learn how to make iPhone app as a single view app and fundamentals of iPhone app development, including how to build a simple iPhone app. The following steps may be easier to make than you think. Follow the Step 1 below to get started and go through for creating application and successfully run it.
Step 1 Create Xcode Project
Install and Setting Up Your Development Environment Download and install Xcode. Xcode is an Integrated Development Environment (IDE) to create all iPhone apps but it requires OS X 10.8 or later to be installed. It contains a suite for software development tools for iOS application. After Installation Xcode; open Xcode.
The following screen will appear:
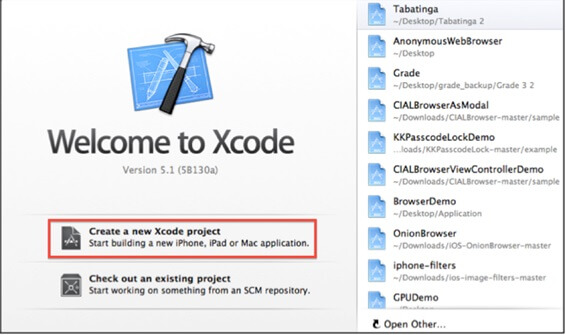
To create a new Xcode project select option Create a new Xcode project. It appears a Choose a template for your project dialog box as shown in given figure.
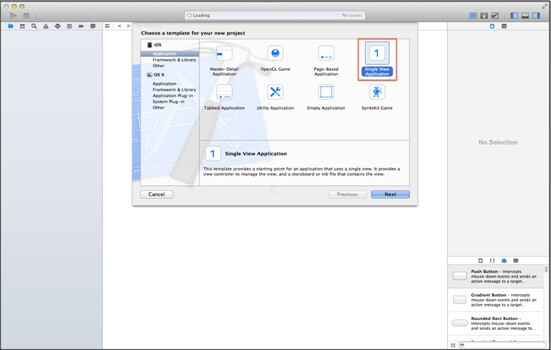
From the dialog box select Single View Application option and press next button.
The following screen will appear:
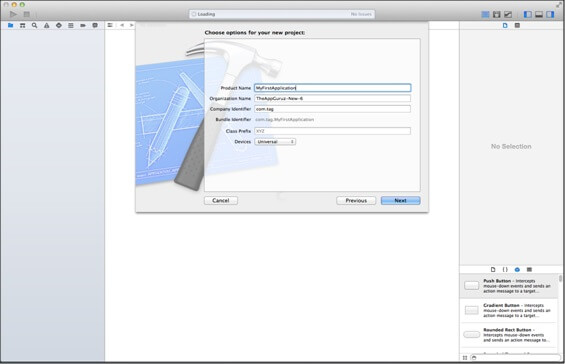
The above screen contains number of fields:
- Product Name
- Organization Name
- Company Identifier
- Bundle Identifier
- Class Prefix.
User has to provide basic information into specific field which is very helpful to create a new project. Also it includes list of devices for which you want to develop application iPhone/iPad. If you want to develop an application for both then simply select option Universal. After giving appropriate application name press next button. It appears “directory dialog box” as following screen:
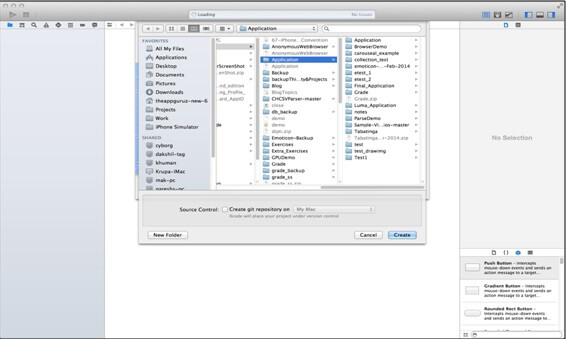
Select the directory for your new project from “directory dialog box” where exactly you want to save your application and select “Create” Button.
The following screen will appear:
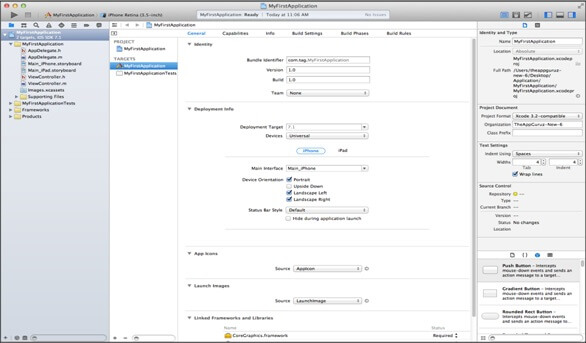
Above screen allow you to select the supported orientations, build and release settings. One of the fields is very important say Deployment Target. It means that what is the earliest OS that you want to run this application? If you set deployment target to iOS 6, you must have iOS 6 to install and run the application.
Step 2 How to run your project?
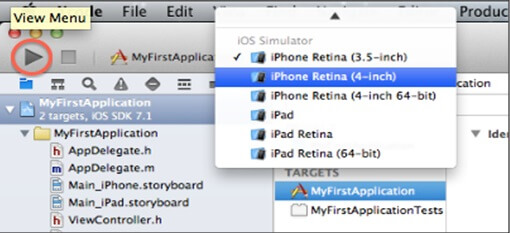
Select Simulator (Top Left corner) from the drop down, which is near Run (denoted in following screenshot) button and select run. Following figure will gives you brief idea.
Step 3 Main.storyBoard Design
When your application builds successfully and run then following output will be displayed.

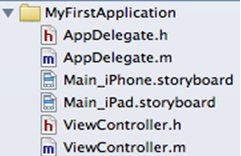
Step 4 Xcode default generated Files
The main files are given below screen that is generated when you have created your application. By implementing code in following files you can perform various operations to the application. They are listed as given below:
I hope you found this blog helpful while developing your own iPhone App in iOS. Let me know if you have any questions or concerns regarding iOS, please put a comment here and we will get back to you ASAP.
Got an Idea of iPhone App Development? What are you still waiting for? Contact us now and see the Idea live soon. Our company has been named as one of the best iPhone App Development Company in India.

I am iOS developer, as a developer my basic goal is continue to learn and improve my development skills , to make application more user friendly.
