Be patient..... we are fetching your source code.
Objective
Main Objective of this post to give you an idea about ImagePickerController and how to pick image from device cameraroll and capture image from device camera.
The iOS image picker is a controller. It allows you to select an image from device gallery or capture it from the camera.In this tutorial we are going to grab the picked image or take a new one if the device has a camera and load it to an image view.
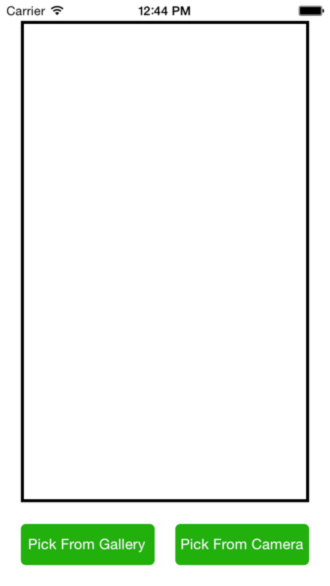
You will get Final Output:

In following demo I have described how to pick image from device cameraroll and capture image from device camera.
ImagePickerController:
The iOS library contains a very useful class known as UIImagePickerController. It is a user interface that provides the functionality to interact with the camera or the photo library. It requires the use of its delegate to respond to the user interactions. You have to set sourceType property to define role and appearance of ImagePickerController.
- UIImagePickerControllerSourceTypeCamera: To take image or movie from camera this sourceType is used.
- UIImagePickerControllerSourceTypePhotoLibrary or UIImagePickerControllerSourceTypeSavedPhotosAlbum: Used to choose from saved pictures and movies.
Step 1 Create Xcode Project
Create new XCode project name it as ImagePickerDemo. It contains one UIViewController in Main_iPhone.storyboard and Main_iPad.storyboard.
Step 2 Design UI
Add two buttons in UIViewController set its title as Pick From Gallery and Pick From Camera respectively in both button. Also add a UIImageView to display picked image in it.
Step 3 Create IBOutlet & Delegate
Define UIImagePickerControllerDelegate and UINavigationController in ViewController.h file. Also Declare UIImagePickerController object. Declare UIPopoverController object to open photo gallery in ipad in popover.
Declare both buttons and UIImageView property in ViewController.h file.
#import <UIKit/UIKit.h>

@interface ViewController : UIViewController <UIImagePickerControllerDelegate, UINavigationControllerDelegate>
{
    UIImagePickerController *ipc;
    UIPopoverController *popover;
}

@property (weak, nonatomic) IBOutlet UIButton *btnGallery;
@property (weak, nonatomic) IBOutlet UIButton *btnCamera;
@property (weak, nonatomic) IBOutlet UIImageView *ivPickedImage;
@end
Step 4 Initialized UIImagePickerController
Inside the action method of gallery button, Initialize UIImagePickerController object, set its delegate to self. Also set its sourceType to UIImagePickerControllerSourceTypeSavedPhotosAlbum. Now check whether the current device is ipad or iphone if it is iphone than just present the UIImagePickerController else present popover with ImagePickerController.
- (IBAction)btnGalleryClicked:(id)sender
{
    ipc= [[UIImagePickerController alloc] init];
    ipc.delegate = self;
    ipc.sourceType = UIImagePickerControllerSourceTypeSavedPhotosAlbum;

    if(UI_USER_INTERFACE_IDIOM()==UIUserInterfaceIdiomPhone)
        [self presentViewController:ipc animated:YES completion:nil];
    else
    {
        popover=[[UIPopoverController alloc]initWithContentViewController:ipc];
        [popover presentPopoverFromRect:btnGallery.frame inView:self.view permittedArrowDirections:UIPopoverArrowDirectionAny animated:YES];
    }
}
Step 5 Open Camera
Inside the action method of camera button, Initialize the UIImagePickerController object and set its delegate to self. Then check whether sourceType camera is available or not if its available then set sourceType UIImagePickerControllerSourceTypeCamera and present camera. If sourceType camera is not available then show alert message.
- (IBAction)btnCameraClicked:(id)sender
{
    ipc = [[UIImagePickerController alloc] init];
    ipc.delegate = self;
    if([UIImagePickerController isSourceTypeAvailable:UIImagePickerControllerSourceTypeCamera])
    {
        ipc.sourceType = UIImagePickerControllerSourceTypeCamera;
        [self presentViewController:ipc animated:YES completion:NULL];
    }
    else
    {
        UIAlertView *alert = [[UIAlertView alloc] initWithTitle:@"" message:@"No Camera Available." delegate:self cancelButtonTitle:@"Ok" otherButtonTitles:nil, nil];
        [alert show];
        alert = nil;
    }
}
Step 6 Open Gallery
Now write the delegate method of UIImagePickerController.
#pragma mark - ImagePickerController Delegate

-(void)imagePickerController:(UIImagePickerController *)picker didFinishPickingMediaWithInfo:(NSDictionary *)info
{
    if(UI_USER_INTERFACE_IDIOM()==UIUserInterfaceIdiomPhone) {
        [picker dismissViewControllerAnimated:YES completion:nil];
    } else {
        [popover dismissPopoverAnimated:YES];
    }
    ivPickedImage.image = [info objectForKey:UIImagePickerControllerOriginalImage];
}

-(void)imagePickerControllerDidCancel:(UIImagePickerController *)picker
{
    [picker dismissViewControllerAnimated:YES completion:nil];
}
In imagePickerControllerdidFinishPickingMediaWithInfo you have a NSDictionary object info. You can get image from that info dictionary by object key named UIImagePickerControllerOriginalImage. Set that image in our UIImageView and dismiss UIImagePickerController.
If you cancel ImagePickerController then imagePickerControllerDidCancel method will be called dismiss UIImagePickerController in that method.
If you have got any query related to iOS Image Picker Controller in comment them below. You can download the demo project from Github.
Got an Idea of iPhone App Development? What are you still waiting for? Contact us now and see the Idea live soon. Our company has been named as one of the best iPhone App Development Company in India.

I am iOS developer with an aspiration of learning new technology and creating a bright future in Information Technology.
iOS Delegates Tutorial
